Heads up! This content is relevant for Clipchamp for personal accounts. Try this link If you're looking for information about Clipchamp for work accounts.
On this page

In this article, we go through the steps that are necessary to have our HTML5 camera API upload videos to the blob storage of Windows Azure. Azure is Microsoft’s popular public cloud offering, which is among the leading offerings for infrastructure as a service (IaaS) cloud services.
Azure is an attractive offering for developers and organizations that are already committed to a Microsoft technology stack. With cloud-enabled counterparts of popular Microsoft products such as Active Directory, SQL Server, and Biztalk, Azure makes it particularly inviting for existing users of these services to migrate to their cloud.
We assume that you have an existing Azure account and skip the steps to create one in this tutorial.
This document is no substitute for reading the Azure documentation, particularly relating to the concepts of its storage services. In here, we merely provide the minimal step-by-step instructions to set up Azure for the Clipchamp API. While we spent substantial efforts in collecting this information, please go through the Azure documentation and conduct your own research to make sure everything in your Azure setup is correct.
The Clipchamp API offers the Azure blob storage service as an upload target for converted/compressed output videos and webcam recordings. Before you can use Azure with the Clipchamp API, there is a small number of setup activities that you need to perform within your Azure account:
Creating a new storage account
Copying the storage account security credentials into your Clipchamp publisher dashboard
Creating one or multiple containers within the Azure blob store
Configuring the Cross-origin resource sharing (CORS) settings to allow the Clipchamp API to access these containers
Creating a new Storage Account
Log into Windows Azure, which takes you to the Azure management portal that lists all the services you have subscribed to:
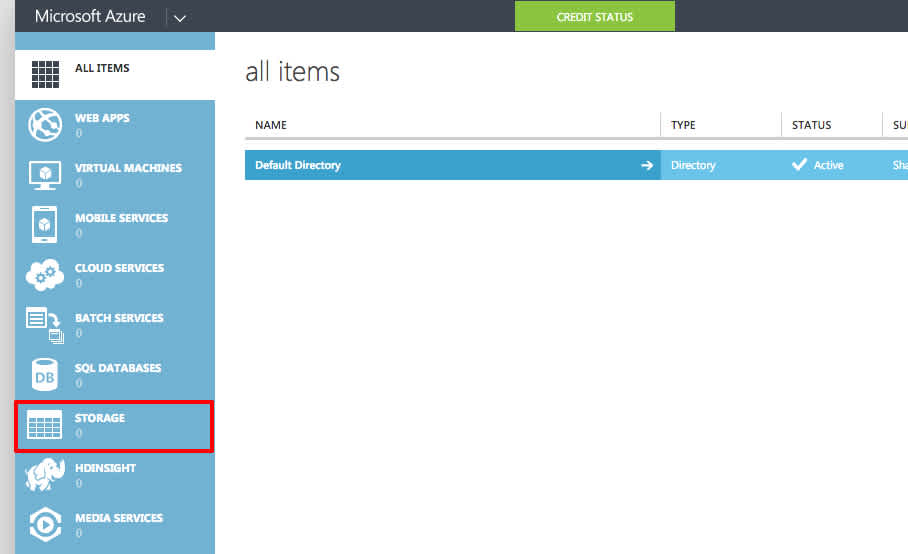
Click on Storage, which shows all existing storage accounts and lets you create a new storage account:
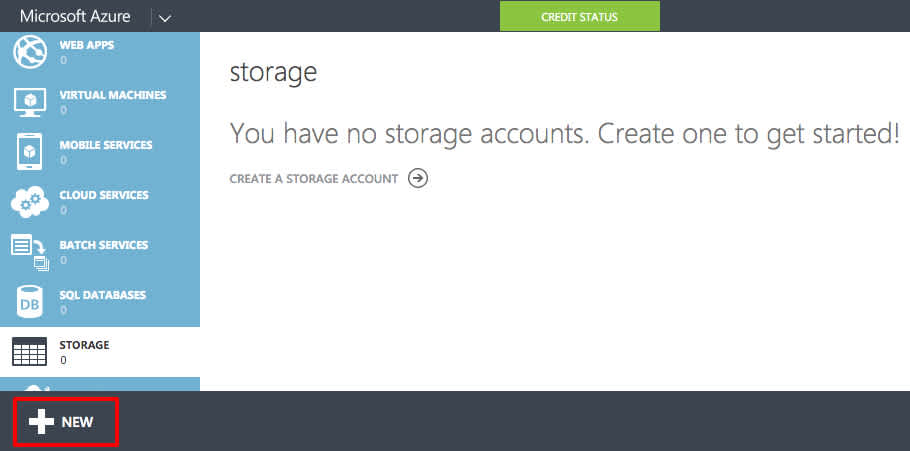
Next, click the NEW button in the lower-left corner:
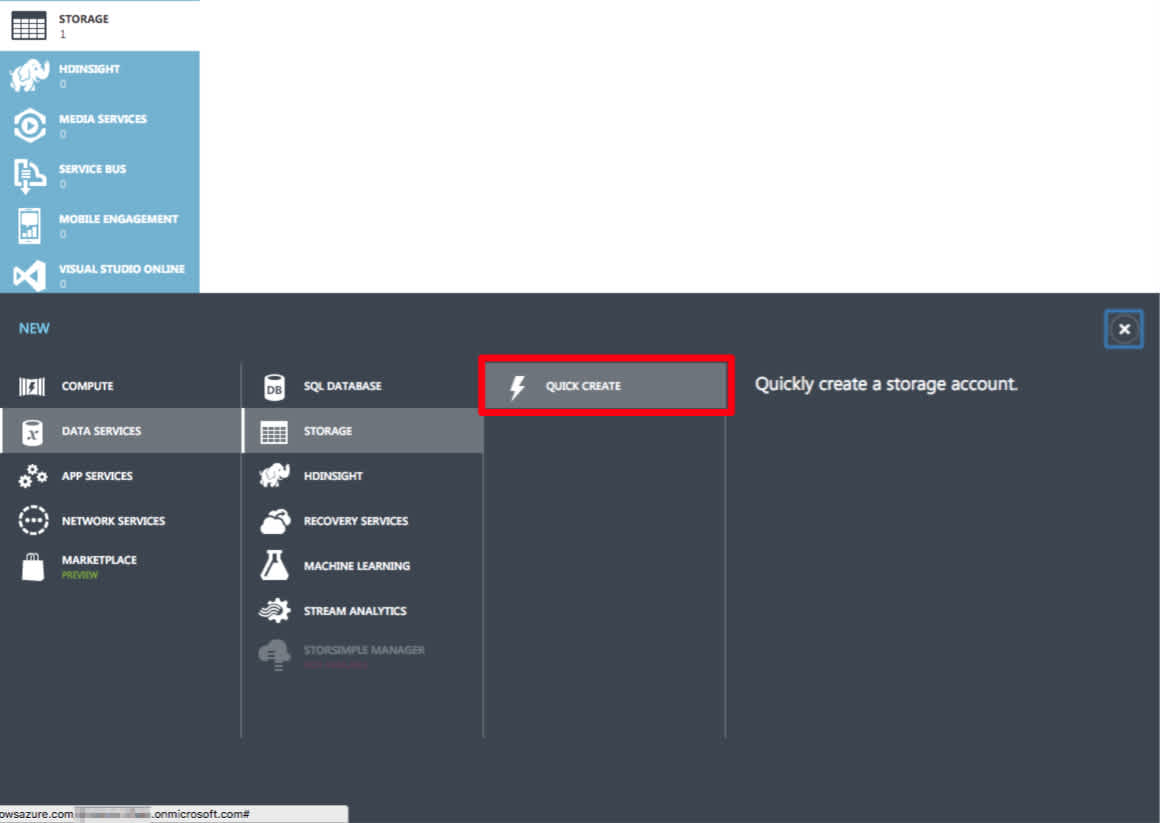
Make sure to select Data Services and Storage, then click the QUICK CREATE link:
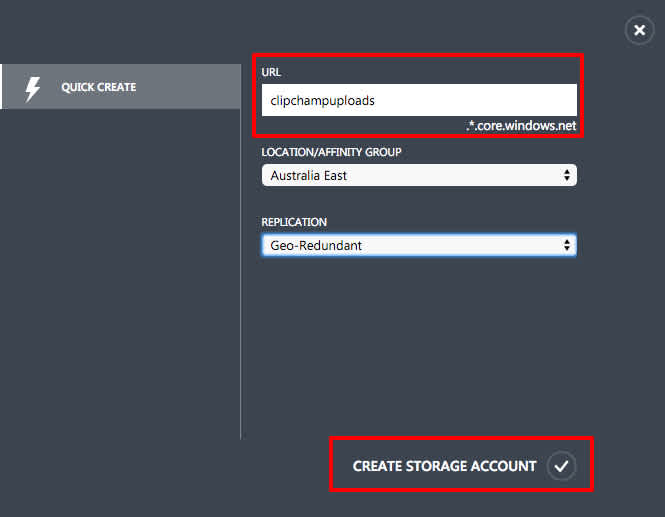
On the expanding form, enter a subdomain name for the URL of your storage account. In the screen shot above, we have chosen clipchampuploads – you can pick whatever name you like for as long as it complies to Azure’s naming rules.
You should also select a data center location for your storage account, which drives down access times when chosen to be a data center that is in relative geographic proximity to the bulk of your users.
Azure further let’s you choose among different replication schemes, the default being Geo-Redundant. Be sure to understand the meaning and implications of these – the folks at Microsoft have written a good article on these.
Finally, click on CREATE STORAGE ACCOUNT to create a storage account with these settings. Azure then takes a few seconds to actually create the account. Once complete, the storage services overview page will look like that (notice that we created a second storage account “clipchamp”, unrelated to this tutorial).
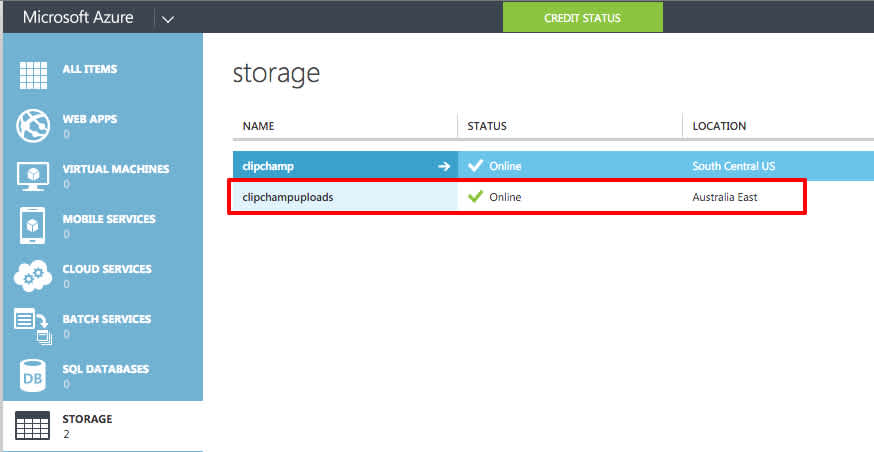
Copy Access Credentials
In order to configure your subscription of the Clipchamp API to use the newly created Azure storage account, click on the storage account, which you just created (here: clipchampuploads).
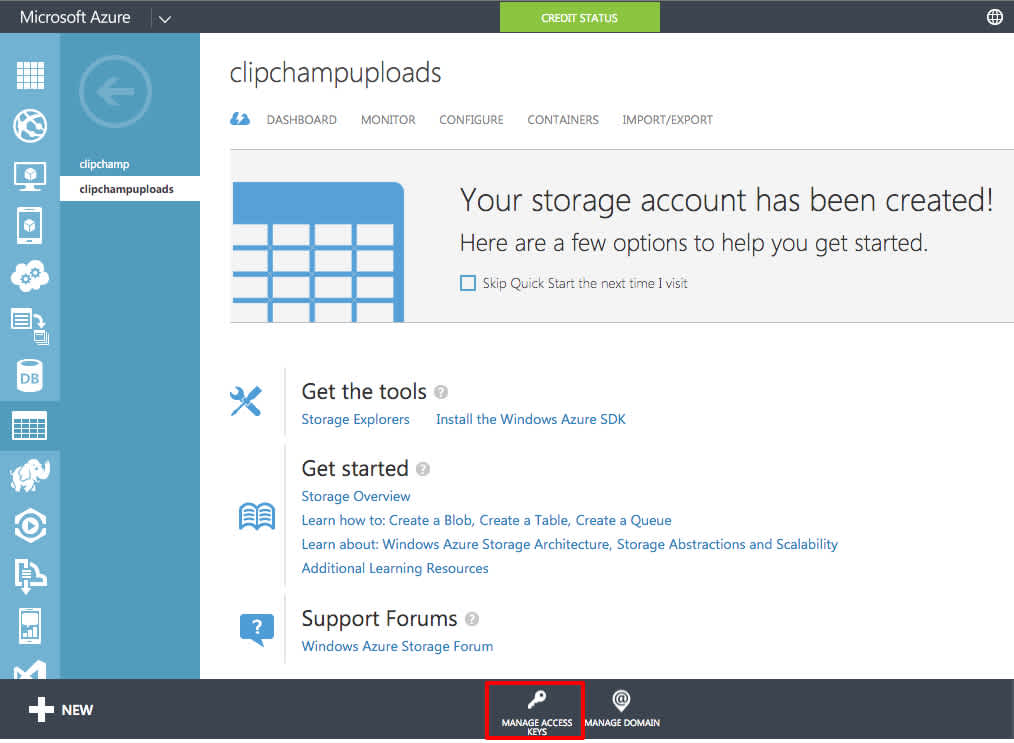
In the upcoming screen, click on MANAGE ACCESS KEYS at the bottom.
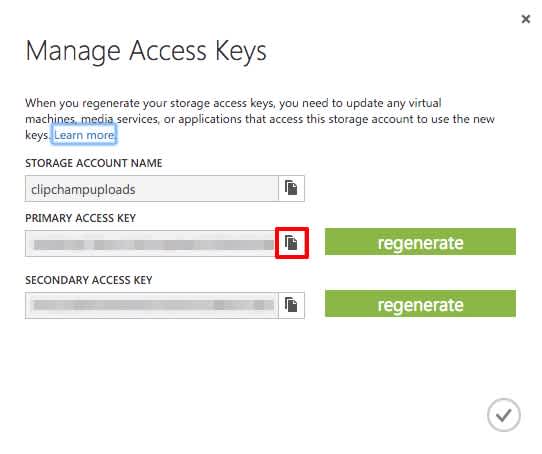
Each Azure storage account comes with two access keys, the Primary Access Key and the Secondary Access Key. _For the purpose of the Clipchamp API, you can use either of these. In the example screenshot above, we have picked the _Primary Access Key. If you have multiple applications accessing your storage account, you should pick the one of the two access keys for Clipchamp that you did not use for the other application(s).
Mark and copy the selected access key into the clipboard by clicking the copy icon right of the respective key. Next, go to your Clipchamp API upload settings page. If you are not subscribed yet, go to the API’s plan selection page and be sure to select a plan that covers the option of uploading videos to Azure. Either way, you will need to transfer the storage account name and access key to your portal page:

Be sure to tick the checkbox in front of “Allow upload to Microsoft Azure” and fill in the storage account name in the upper input field and paste the selected access key into the lower field. Then click on Finalize signup (when creating a new subscription) or Apply changed settings (when updating an existing subscription).
Creating a Blob Storage Container
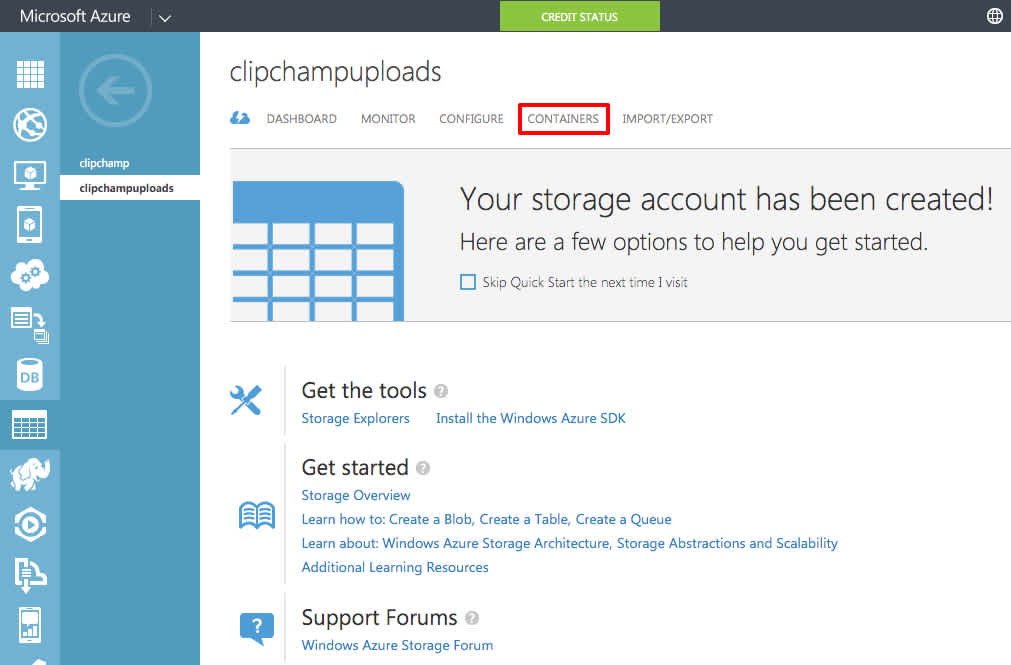
Now return to your storage account overview page and click on CONTAINERS:
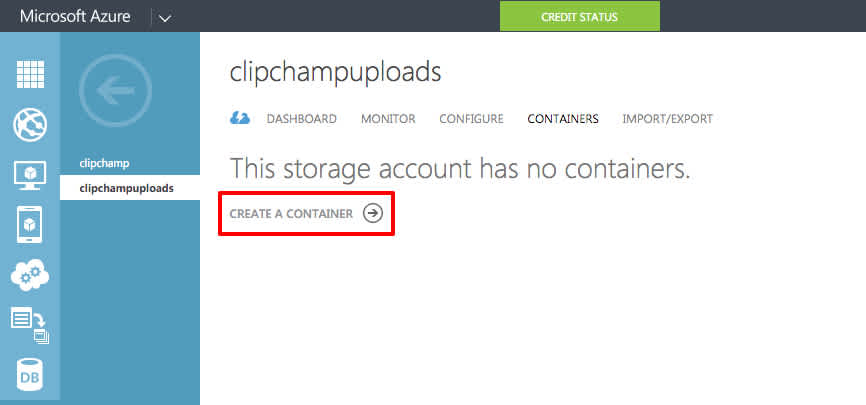
Next, click on CREATE A CONTAINER:
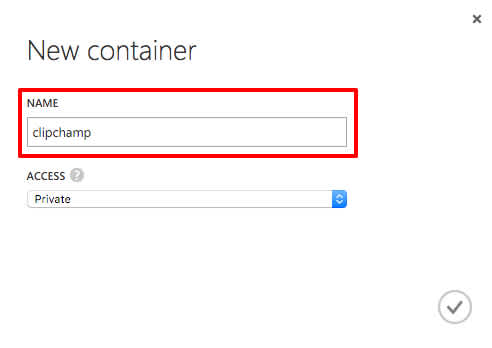
Name the container as you like (here: clipchamp). You will later need to specify that very container name when invoking the Clipchamp API and instructing it to upload videos into this container.
Also be sure to select an appropriate access privilege.The default is private, which means that without access credentials, this container (and its contained files) cannot be accessed. If, for example, you would like to display the videos that were uploaded into this container on your website, you may want to choose a more permissive access privilege. At any rate, be sure to understand the meaning and implications of these options.
Configure Container CORS Settings
As the final step, you will need to configure the Cross-Origin Resource Sharing (CORS) options for the container. Unfortunately, Microsoft has not yet made that option available within the Azure portal (thank you, Microsoft!), which is why you will need to download and install a separate tool to do so.
Knowing their shortfalls in providing a comprehensive configuration interface themselves, the folks at Microsoft have put together an article that surveys different tools to manage an Azure storage account.
For the purpose of this article, we have picked the Azure Storage Explorer for Windows, which you can download free of charge.
Notice that we do not accept any responsibility for the proper functioning of this tool or its suitability to your business. Please make sure to read the vendor’s usage terms and other documentation.
After downloading and installing the Azure Storage Explorer, run it and click on Add Account:

Enter the Storage account name (here: clipchampuploads) and one of the storage account access keys. Then click Test Access to confirm the proper that Azure Storage Explorer can access your storage account:
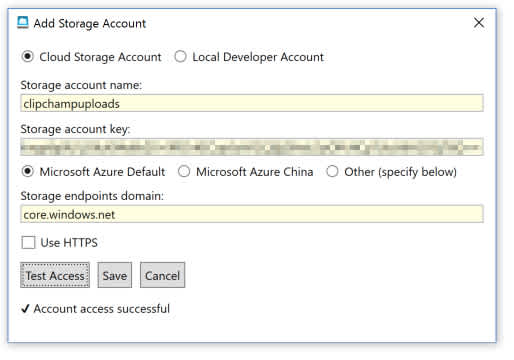
Then click Save. The main window should now list the previously created blob container (here: named clipchamp). By clicking on Blob Containers, some buttons appear above. Click the CORS button.

In the upcoming Configure Blob Service CORS Rules dialog, click New:
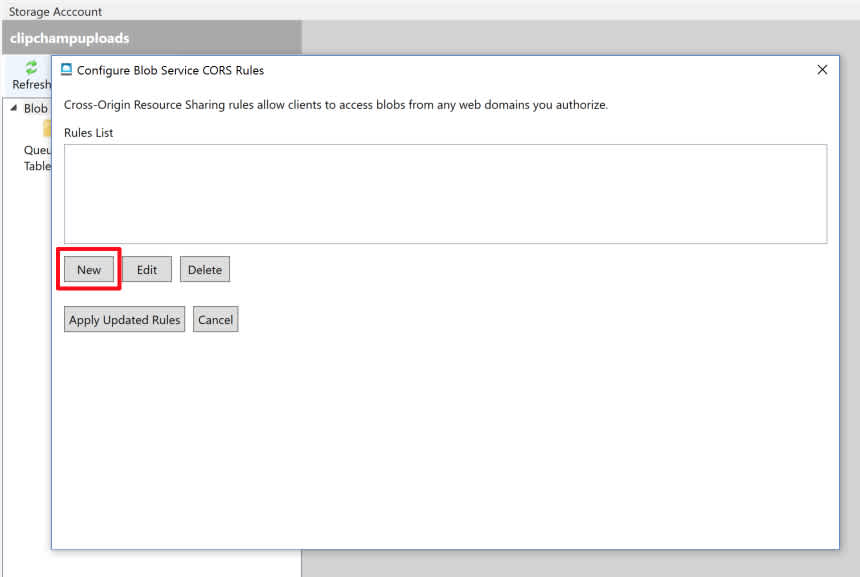
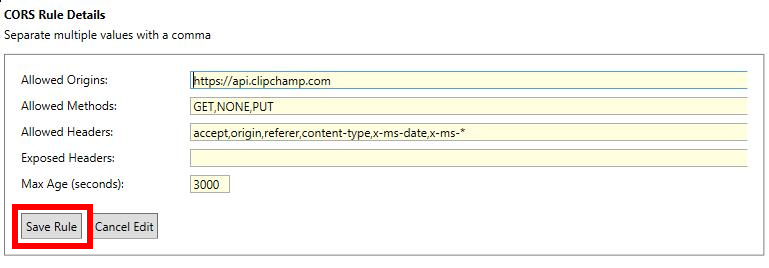
You are then prompted to enter the details of the CORS headers that Azure will attach to the CORS preflight (OPTIONS) and actual (PUT, GET) requests. Please enter the following details into the respective fields:
The Accept, Origin, and Referer headers are required in order to receive uploads from iOS devices. Then click the Save Rule button:
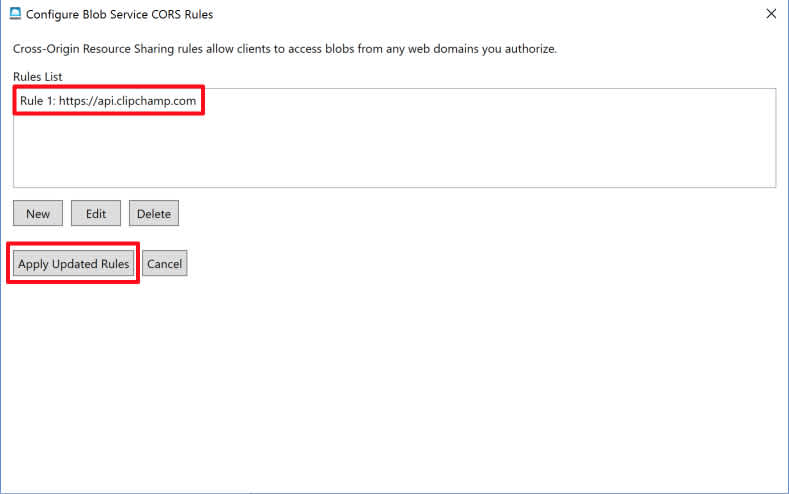
Finally, the newly created CORS settings show up in the rules list. Push the Apply Updated Rules button to apply them to your Azure storage account:
You can then close the Azure Storage Explorer application and are good to go ahead with trying out an Azure upload using the Clipchamp API. Please consult the Clipchamp API documentation for Azure-specific settings.

