"Heads up! The screenshots in this article are from Clipchamp for personal accounts. The same principles apply to Clipchamp for work and school accounts."
On this page
Easily delete unwanted parts of a video, trim away mistakes, and cut your video or asset to the perfect length with our online video trimmer.
Transform your video for free in seconds by trimming away excess footage, bloopers, and awkward silences without leaving your browser. You can even trim audio recordings, music, graphics, and images so you can keep your viewers entertained for longer. Once your MP4 file or MP3 file is the right length, polish your video with beginner-friendly video editing features like rotate, resize, crop and transitions.
Read on to explore how to trim videos, audio, images, and graphics using the video trimmer in Clipchamp.
How to trim video online
Step 1. Import your own videos or add stock media
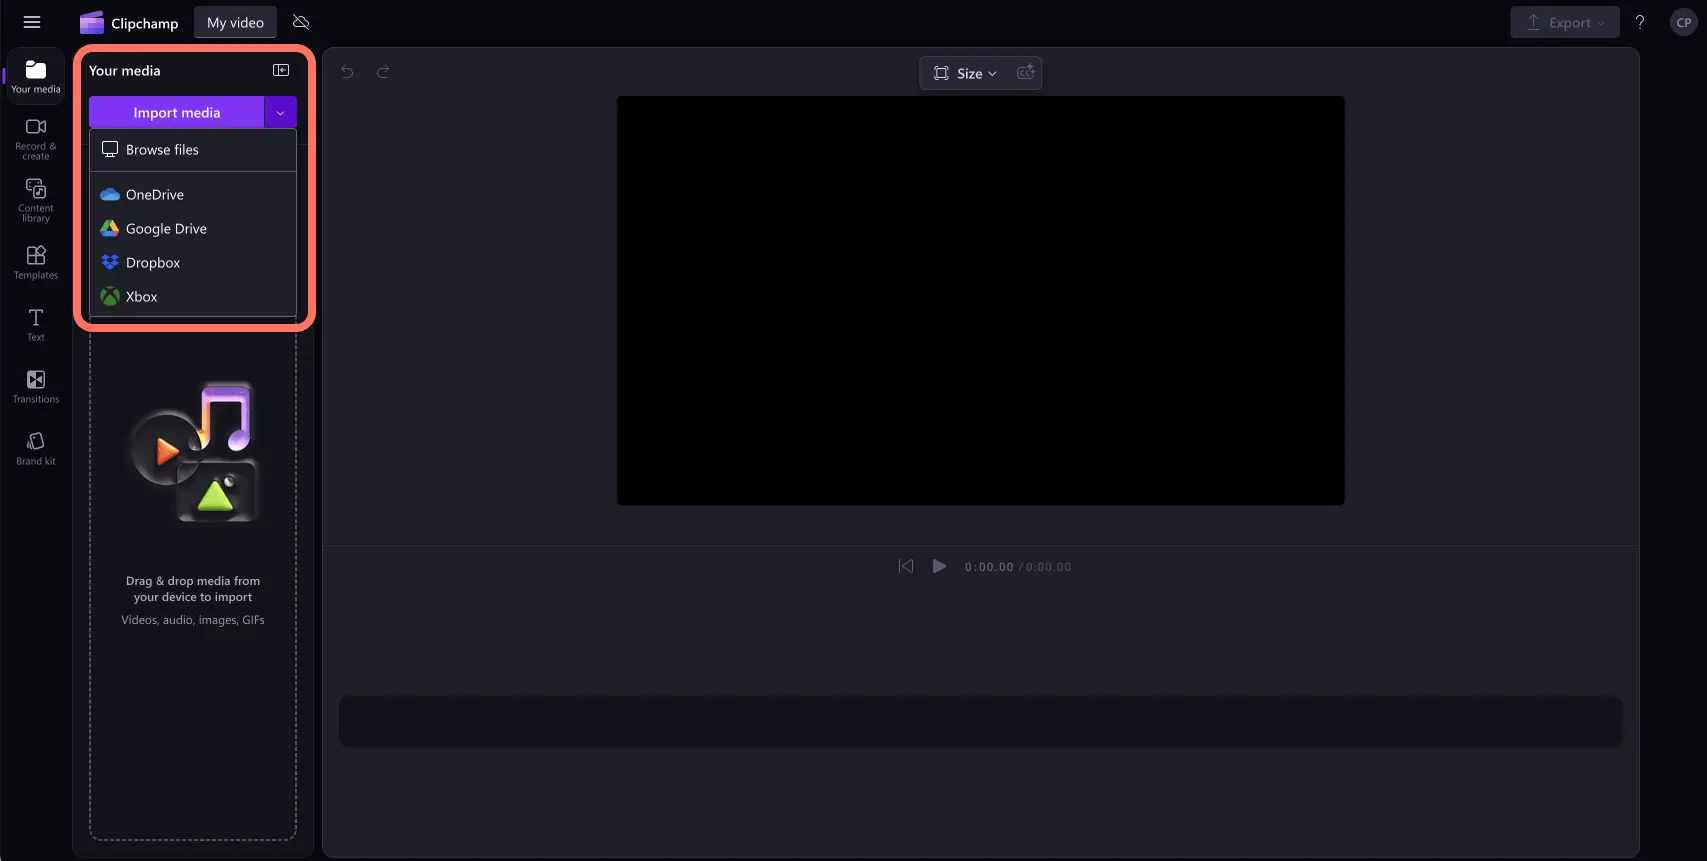
To start editing, you’ll need to import your own media or add stock videos. Click on the import media button in the your media tab on the toolbar to browse your computer files, or connect your OneDrive.
For more help, check out the adding video help article.
If you would like to include any stock footage like videos and images, click on the video library tab on the toolbar. Browse the royalty-free video library to select the right stock for your video. Use the search bar to look for stock based on keywords or click on the see more button within a video category.
Drag and drop your videos onto the timeline.
Step 2. Trim videos on the timeline
Trim videos with the online video trimmer tool
To trim the length of your video, click on the video on the timeline so it’s highlighted green. Move the green handles to the left of the timeline to trim the video length. If you trim too much footage off your video, just drag the green handle back to the right to recover your footage. The video trimmer uses a dragging method to trim assets on the timeline.
Check out the trim help article for more help.
To trim multiple assets at once, try the multi-item editing feature. Hold down the shift key (Windows) or command key (MacBook) on your keyboard, then click each asset on the timeline then dragging one of the green handles to trim.
Your assets will now appear on the timeline with gaps between them. Gaps will appear when assets are trimmed using the video trimmer.
To remove the gaps between your clips, simply right click on the gap, then click on the delete all visual gaps button. You can also click on the trash can icon or the delete this gap button on the timeline to remove gaps one by one.
Trim videos using the split and delete tool
You can also trim assets by splitting clips and deleting the unwanted footage. Click on the asset on the timeline so it’s highlighted green, then move your seeker to the timestamp where you would like to split. Click on the split button to cut your clip. If it’s in the middle of a clip, split twice.
Your video will now be split into two parts. Click on the excess footage on the timeline so it's highlighted green, then click on the delete button. You can also use the delete button on your keyboard to remove assets from the timeline.
There will now be a gap on the timeline where your asset was trimmed. Click on the delete this gap button to remove the gaps between your clips on the timeline.
Check out the gap removal help article for more help.
Step 3. Preview and save your video
Before saving your new video, make sure to preview by clicking on the play button. When you’re ready to save, click on the export button and select a video resolution. We recommend saving all videos in 1080p video resolution. Paid subscribers can save in 4K video resolution.
For more help, check out our YouTube tutorial on how to trim videos fast and free using the video trimmer.
Frequently asked questions
Can I trim my video’s audio in Clipchamp?
The online video trimmer lets you easily cut any unwanted audio, videos, images, or graphic assets free, without having to download any external software.
How do I trim part of a video?
If you would like to trim a specific section of a video or audio clip, use the split tool to separate your media into three sections. Go to the specific timestamp where you would like to split the clip, repeat the process at the ending timestamp and delete the clip in between. Use the split keyboard shortcut for faster editing.
Can trimming change the meaning of a video clip?
Trim away parts of a clip that doesn’t suit your video’s style, aesthetic, or genre using the online video trimmer. You can communicate different meanings to your viewers by trimming clips, rather than keeping a lengthy clip.
How do I trim a video on Windows 11?
Easily trim videos for free using the online video trimmer in the Clipchamp Windows app.
If you're looking for more ways to personalize your videos, check out how to remove audio from video, or explore how to make an image transparent.
Transform your videos for social media my trimming any asset in seconds using the video trimmer in Clipchamp or download the Clipchamp Windows app.


