Heads up! The screenshots in this article are from Clipchamp for personal accounts. The same principles apply to Clipchamp for work and school accounts.
On this page
Want to create engaging and educational video tutorials viewers will love? With the right combination of planning, video recording, and video editing, share helpful tutorials no matter if you're a content creator or business.
Consumers are increasingly relying on social media videos to learn, watching product demos, frequently asked questions, and even review videos. With over 66% of consumers watching video content before making a purchase, it’s no surprise video remains one of the most popular ways to learn about products.
Explore everything you need to know about creating effective video tutorials and learn how to create tutorial videos using AI voiceovers and the webcam recorder in Clipchamp video editor.
Three effective tutorial video formats
Creating tutorial videos can be approached in various ways, but choosing the right format depends on content, audience, and goals. Here are three popular formats to consider, each with its own advantages and ideal scenarios.
1. Screen recording tutorials
Screen recording tutorials work well for how-to videos that demonstrate software, websites, or other on-screen tasks. This format captures the screen during the process, making it easier for viewers to follow.
Pros
Viewers can see each step clearly, making it easier to grasp complex processes.
Tutorials can be created by recording in real-time, which saves time and ensures accuracy.
Focus stays on the task with minimal distractions. Adding visual aids like animated arrows and cursor highlights can enhance viewer understanding.
Screen recording video ideas
Software walkthroughs.
Website navigation.
High school lessons.
Tips for engaging delivery: keep curser movements slow and easy to follow. Make sure webcam recordings are clear and recorded without background distractions. Use AI noise suppression to remove any unwanted background noise.
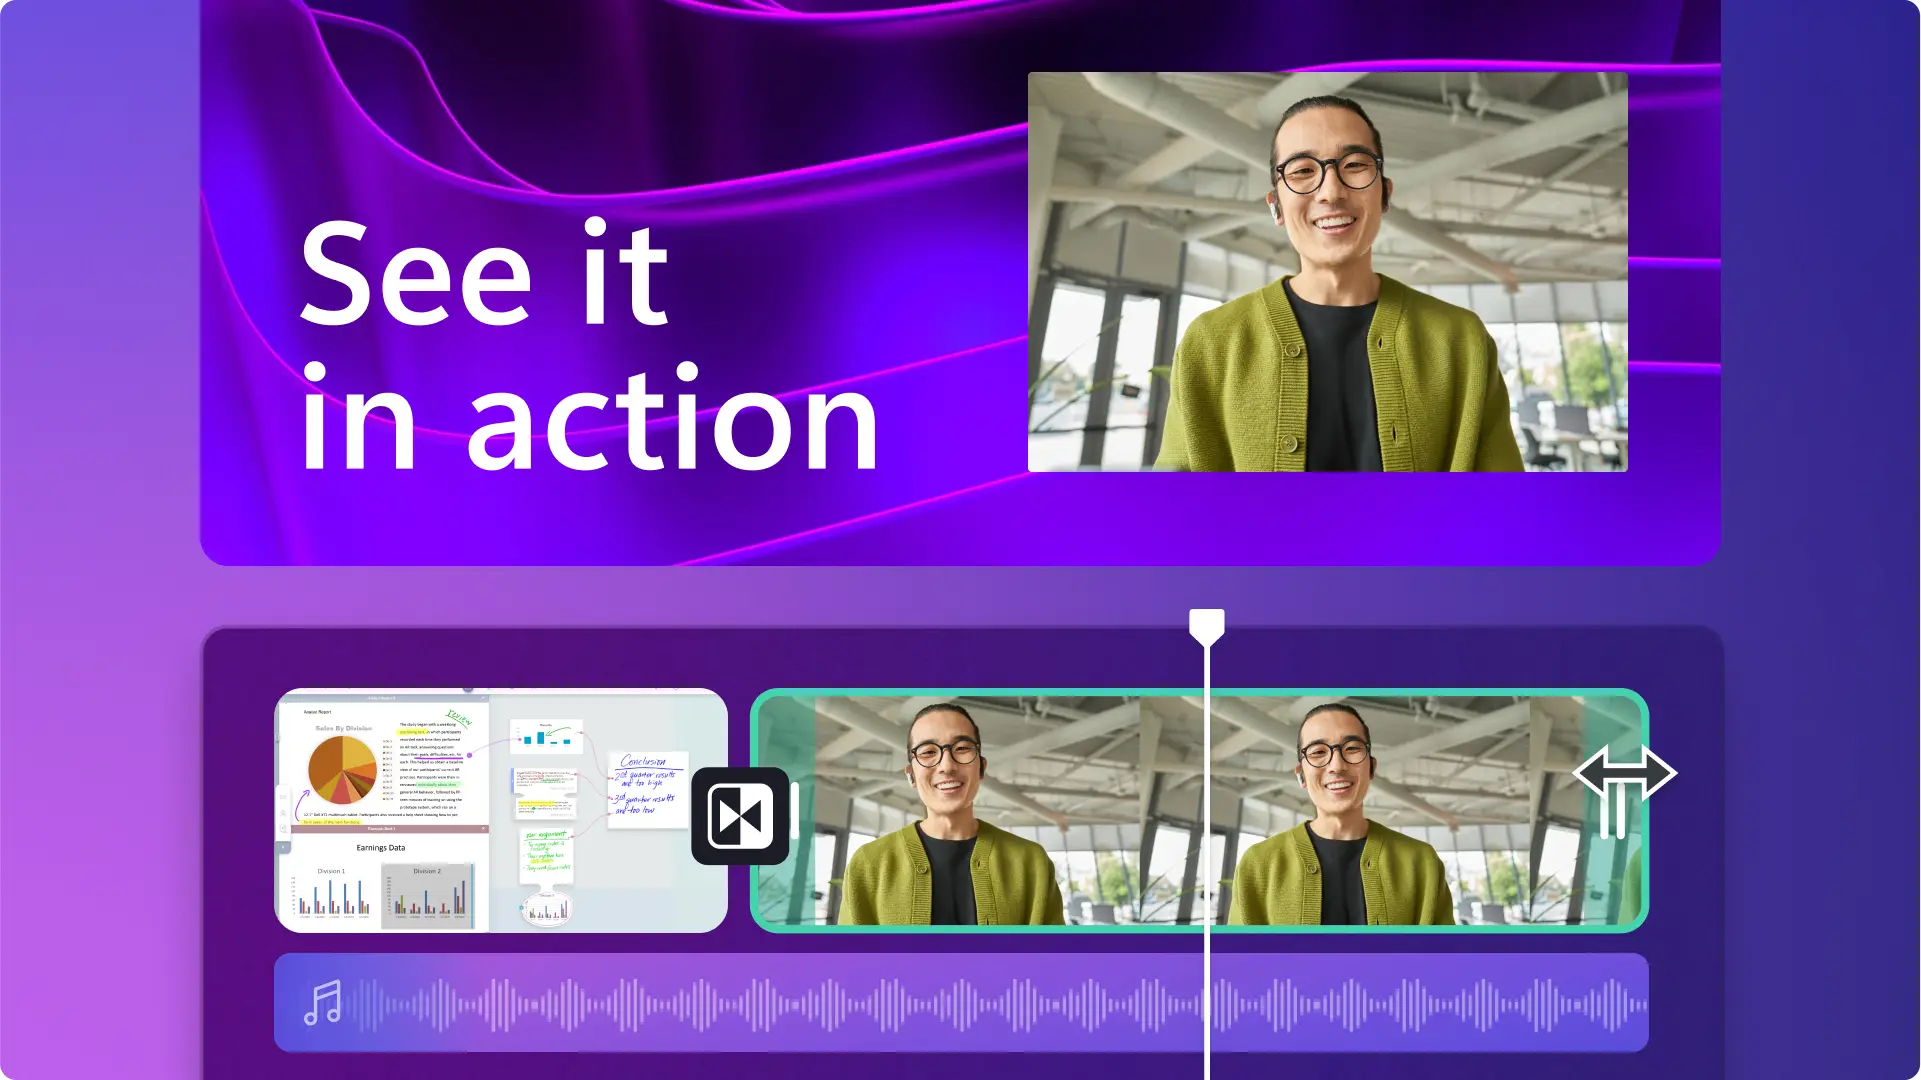
2. Talking head video tutorials
Talking head videos feature the presenter speaking directly to the camera via a webcam recording or video overlay. This format is effective for explaining concepts and building a personal connection.
Pros
Seeing a real person increases engagement and helps humanize the content.
Visual aids like on-screen graphics can support key points and maintain interest.
Establishes authority and credibility. A confident speaker builds trust with the audience.
Taking head video ideas
Educational content.
Expert interviews.
Personal video podcasts.
Tips for engaging delivery: look directly into the camera to build a connection. Use natural hand gestures and facial expressions to keep the energy up, and practice ahead of time to stay fluent and avoid reading from a script.
3. Interactive slideshow tutorials
Interactive tutorials encourage active participation through elements like clickable buttons, quizzes, or decision-based navigation. This format improves engagement and information retention.
Pros
Keeps audiences involved, which improves learning outcomes.
Allows for personalized content tailored to different learning needs.
Offers real-time feedback with quizzes or interactive video slides.
Add YouTube videos to presentations in Google Slides so you can incorporate engaging content without having to leave the browser you're presenting from.
Interactive slideshow video ideas
Online learning modules.
Virtual training videos.
Product demos with interactive elements.
Tips for engaging delivery: make sure audio and video sound is clear, crisp, and easy to follow. Add AI subtitles to increase accessibility and ensure viewers can watch on mute.
How to plan a tutorial video
Planning is the foundation of successful tutorial and instructional videos. A well-organized plan helps ensure the content is clear, concise, and engaging. Use this step-by-step guide to streamline the video tutorial planning process.
Step 1. Define video objectives
Start by setting clear video goals and knowing what you want to achieve will shape every part of a tutorial.
Identify the tutorial's main goal: determine if you're teaching a specific skill, explaining a concept, or demonstrating a process. Having a clear goal helps keep tutorial videos focused and well written.
Determine the key takeaways for your audience: viewers should know what to do or understand after watching. Clear outcomes prevent detours and help maintain focus.
Step 2. Know your target audience
Understanding who you're creating for is key to making content that resonates.
Conduct audience research: learn who your viewers are, their interests, and their skill levels. This information will help you create video content that resonates with viewers.
Consider the audience’s perspective: try to understand their challenges and the solutions they’re seeking. Addressing these points makes video tutorials more valuable and engaging. Remember, you're their hero in the quest for knowledge.
Step 3. Create a video tutorial outline
An outline acts as a guide, helping you organize your message and deliver it in a logical flow.
Break down the content into manageable sections: divide a tutorial into clear, logical steps or segments. This makes the information easier to follow and digest.
Include key points and sub-points: outline the main topics and any supporting details you need to cover. This structure keeps video content organized and comprehensive.
Step 4. Gather video resources
Preparing for a video tutorial in advance sets the stage for smooth production and publishing.
Brainstorm video script and elements: list all required materials, including software like Clipchamp video editor, scripting tools like Microsoft Copilot, and any other tools you’ll need.
Prepare visual aids and examples: gather any images, screenshots, or videos you’ll use to illustrate tutorial points.
Step 5. Review to avoid video planning mistakes
Overloading with information: keep your content focused and concise. Too much information can overwhelm viewers and dilute the key message.
Skipping the outline: an outline helps maintain a clear structure and covers all important points. Without it, tutorials can look confusing right from the start. Don't give the impression that your tutorial video could do with its own tutorial. Check out how to write video scripts for how brainstorm and structure tutorials.
Elements of a great tutorial video
Video flow and structure
A well-organized tutorial helps viewers follow along smoothly.
Create a logical sequence: present video tutorials in a clear order so each step naturally leads into the next.
Use storytelling techniques: introduce relatable scenarios or examples to make the information more memorable.
Vary your content delivery: blend visuals, audio, and interactive elements to appeal to different learning styles and keep the pace dynamic.
High-quality video footage and visuals
Visual and audio quality can make or break the viewer’s experience.
Invest in good equipment: use HD camera and microphone to ensure clear visuals and audio. High-quality production makes tutorials look professional and trustworthy.
Combine visuals: select a mix of videos, images, and GIFs to convey tutorial messages and support main video visuals.
Edit for clarity: use an online video editor to remove unnecessary parts and to keep the storytelling and flow of information tight. Clean, well-edited videos are easier to follow and more enjoyable to watch.
Add video overlays: use the picture-in-picture effect to overlay images and videos onto your tutorial to help teach your lesson.
Add video transitions: smooth scene transitions between sections help maintain the flow and keep viewers engaged. Think of transitions as the glue that holds content together.
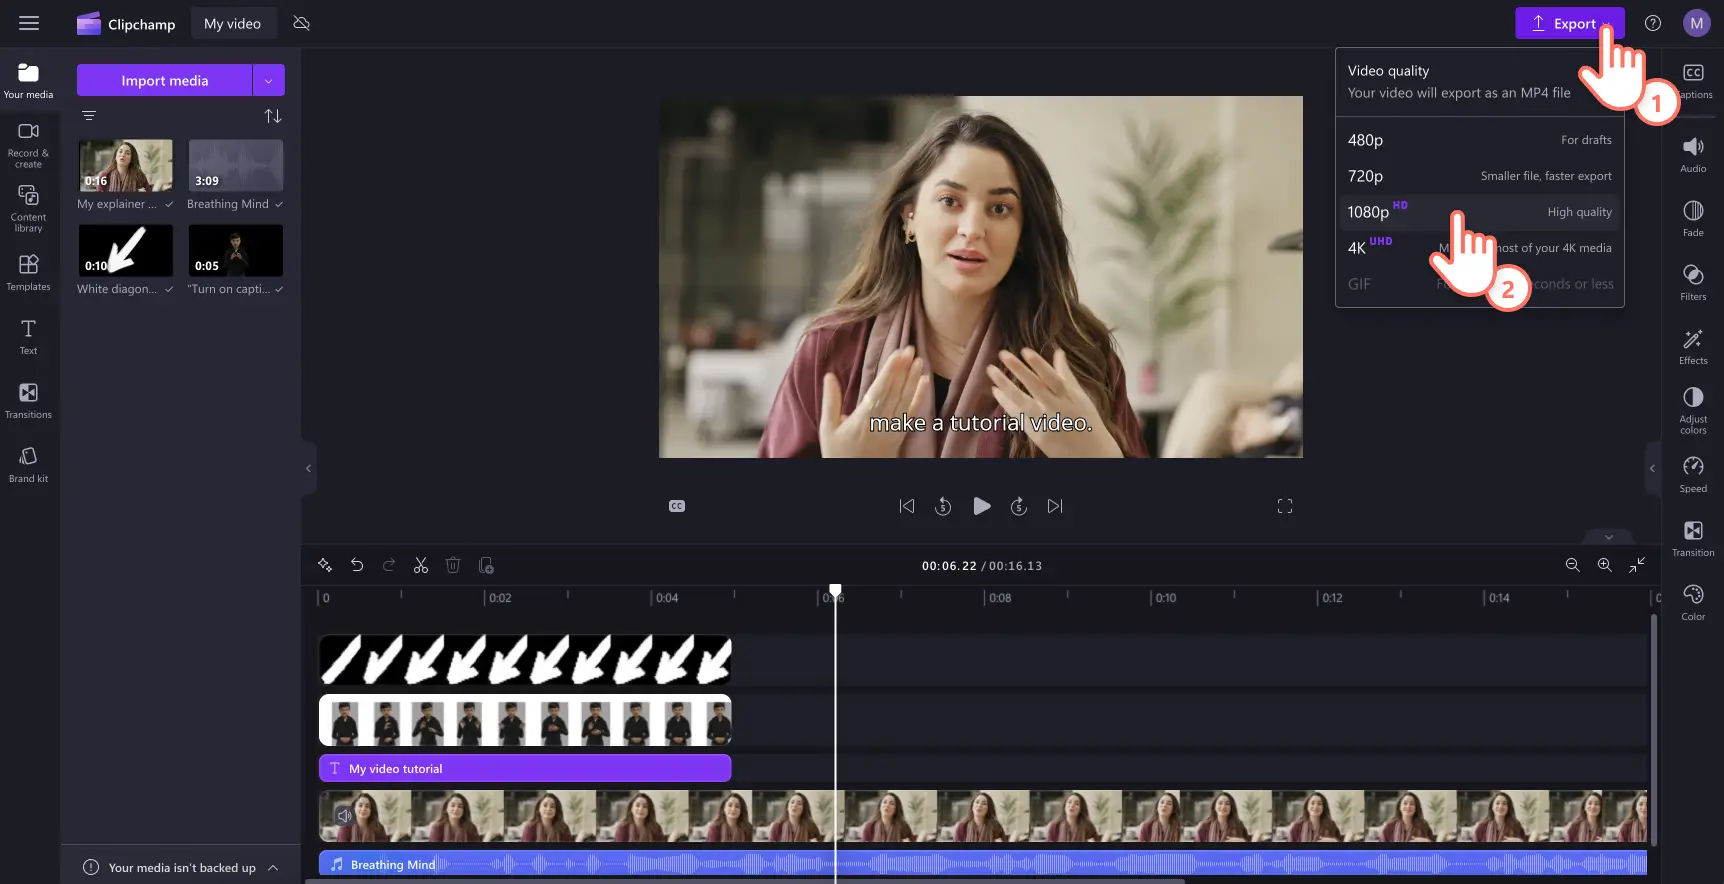
High-quality playback: save tutorial videos in high-definition 1080p video resolution for the best quality.
Video audio and background music
While visuals are most important, don’t overlook the impact of great audio. background audio can help enhance learning experience.
Choose music tracks: add soft royalty-free background music to engage viewers without distracting from the tutorial content.
Add voiceover for clarity: create authentic and clear AI voiceovers to capture attention on social media and make your tutorial video easier to follow on.
Add SFX sound effects: add unique sound effects to specific sections within the tutorial video to highlight messages or keywords.
Video accessibility
Make sure videos include and are accessible for all viewers. Video tutorials should be just as informative and accessible on the web with sound as without.
Add AI captions: refine how to videos with subtitles to help viewers understand your content on mute with AI captions.
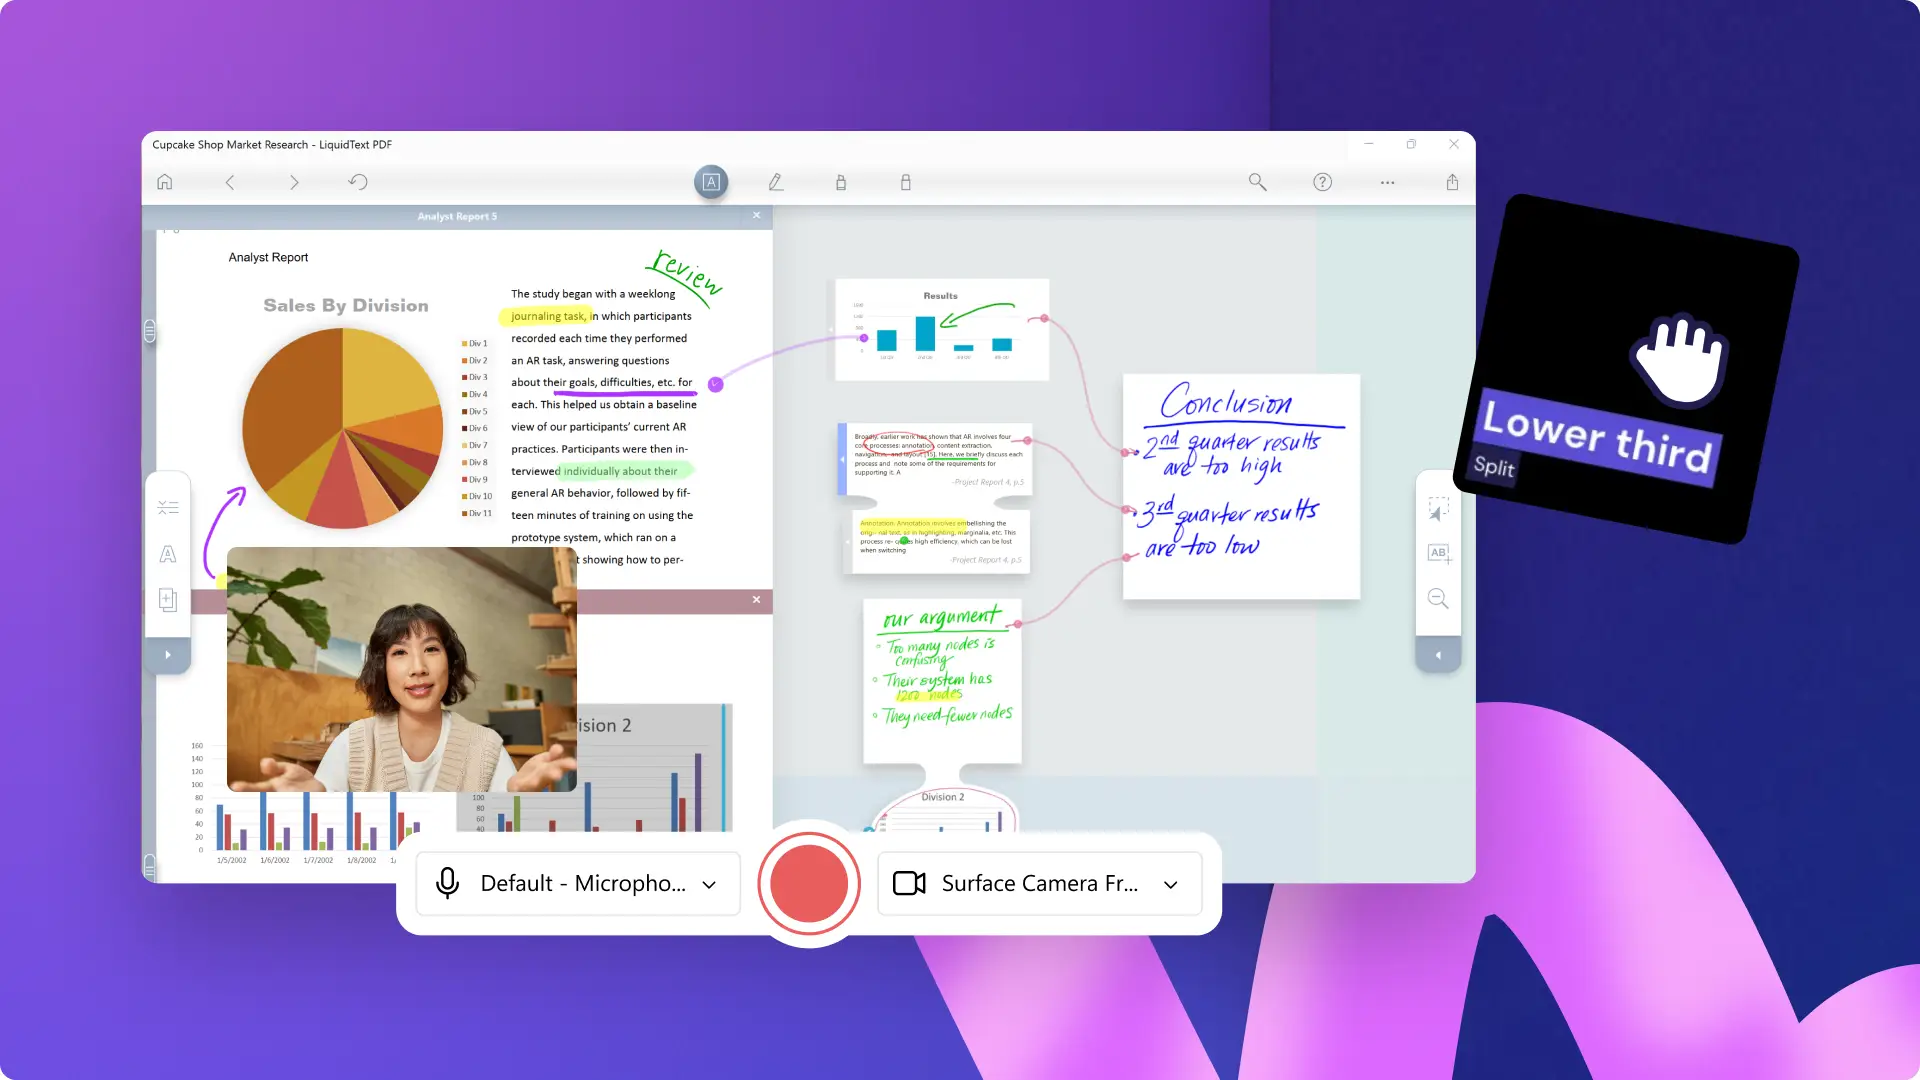
Layer text animations: add on screen lower third titles and text options to define tutorial steps and introduce subjects or teachers.
Add Americal Sign Language stickers: place ASL video stickers side by side with your video content or as standalone video clips to convey meaning to the deaf and hard of hearing community.
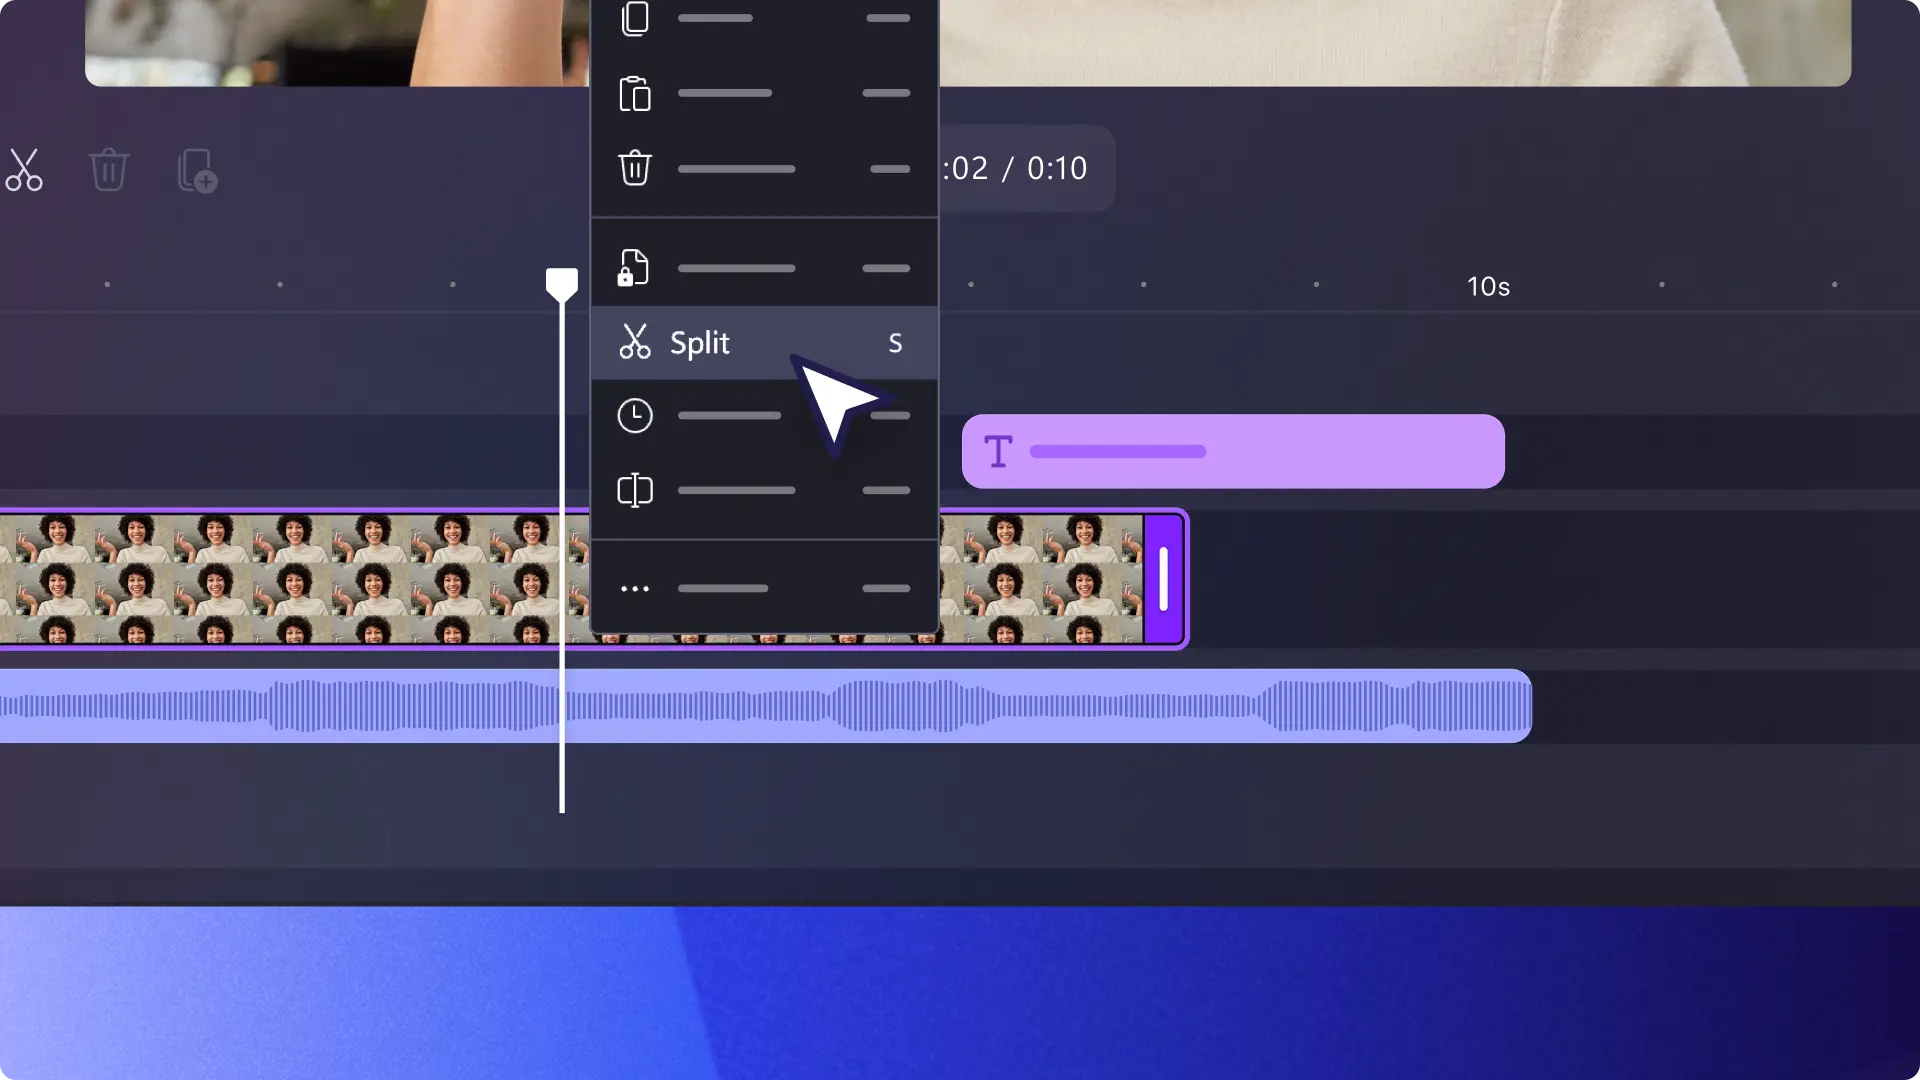
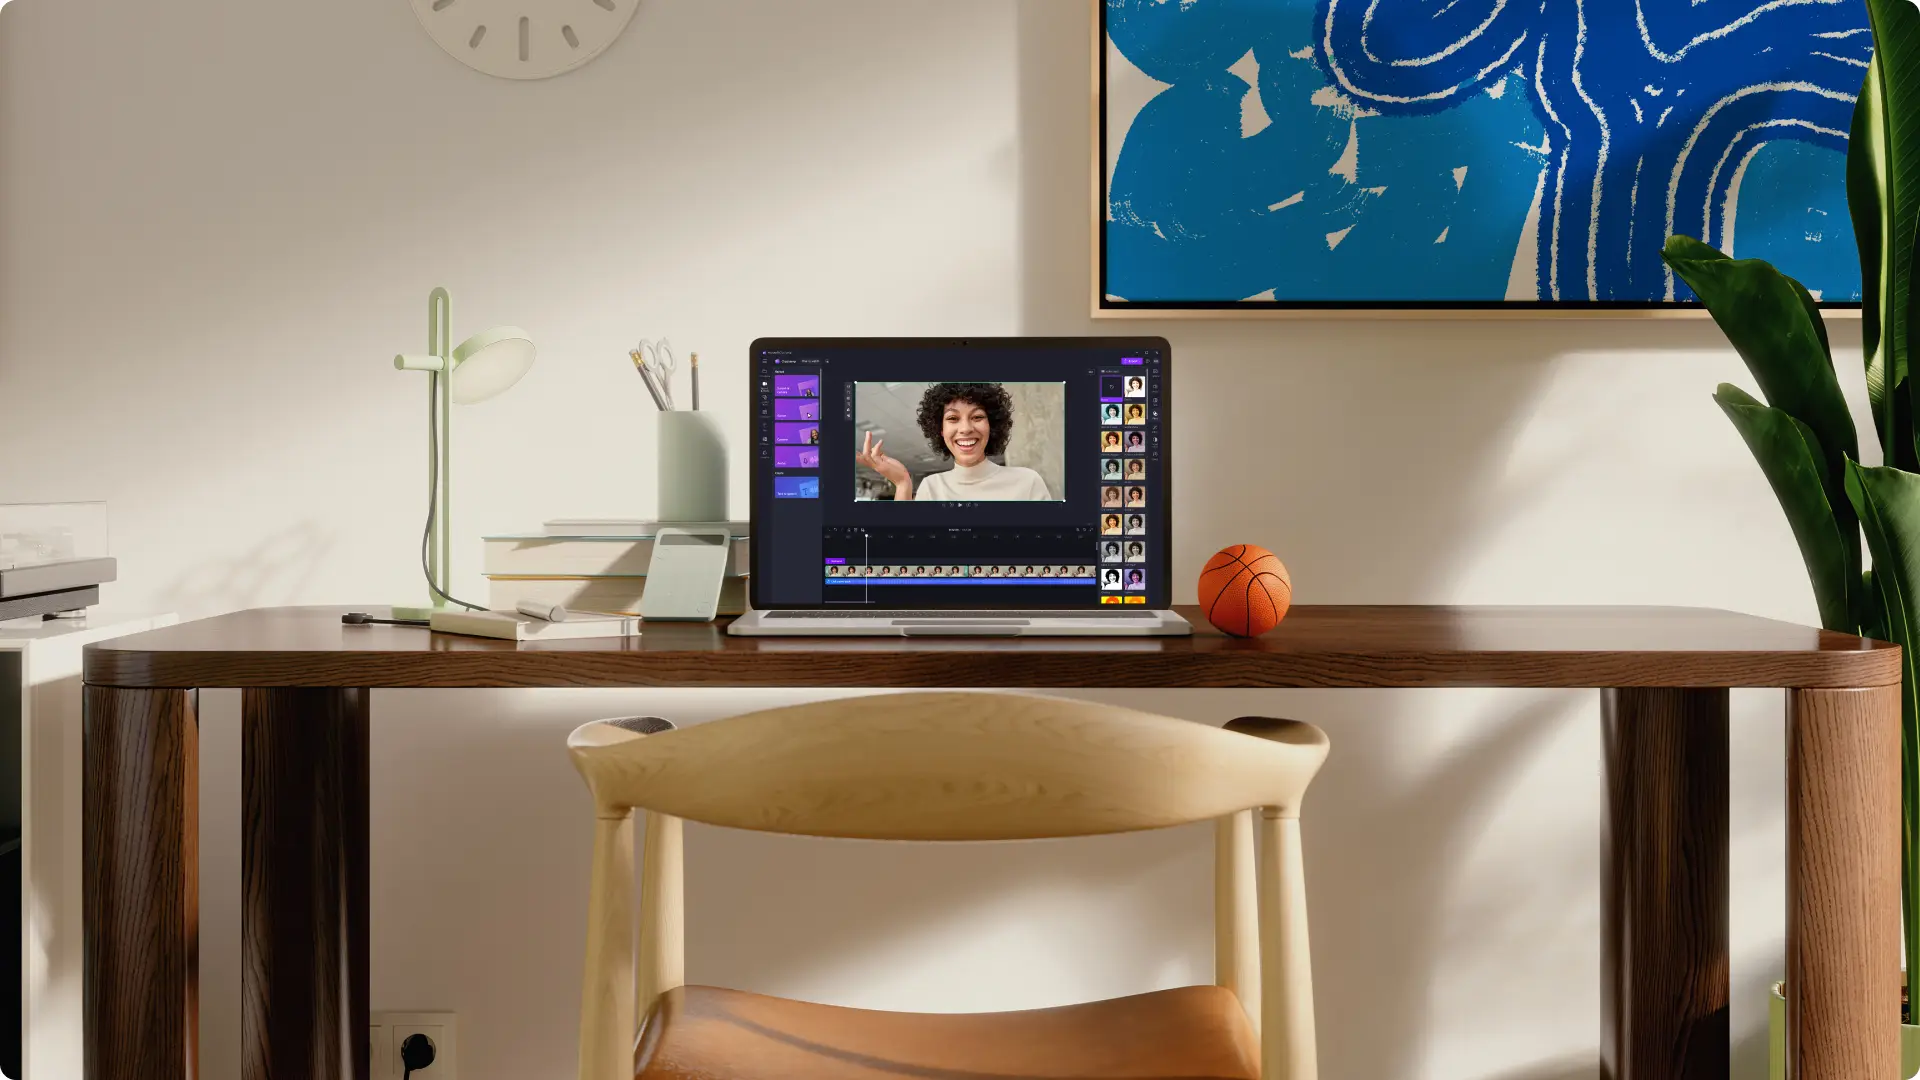
How to edit a tutorial video in Clipchamp video editor
Step 1. Import videos, select stock footage, or record a video
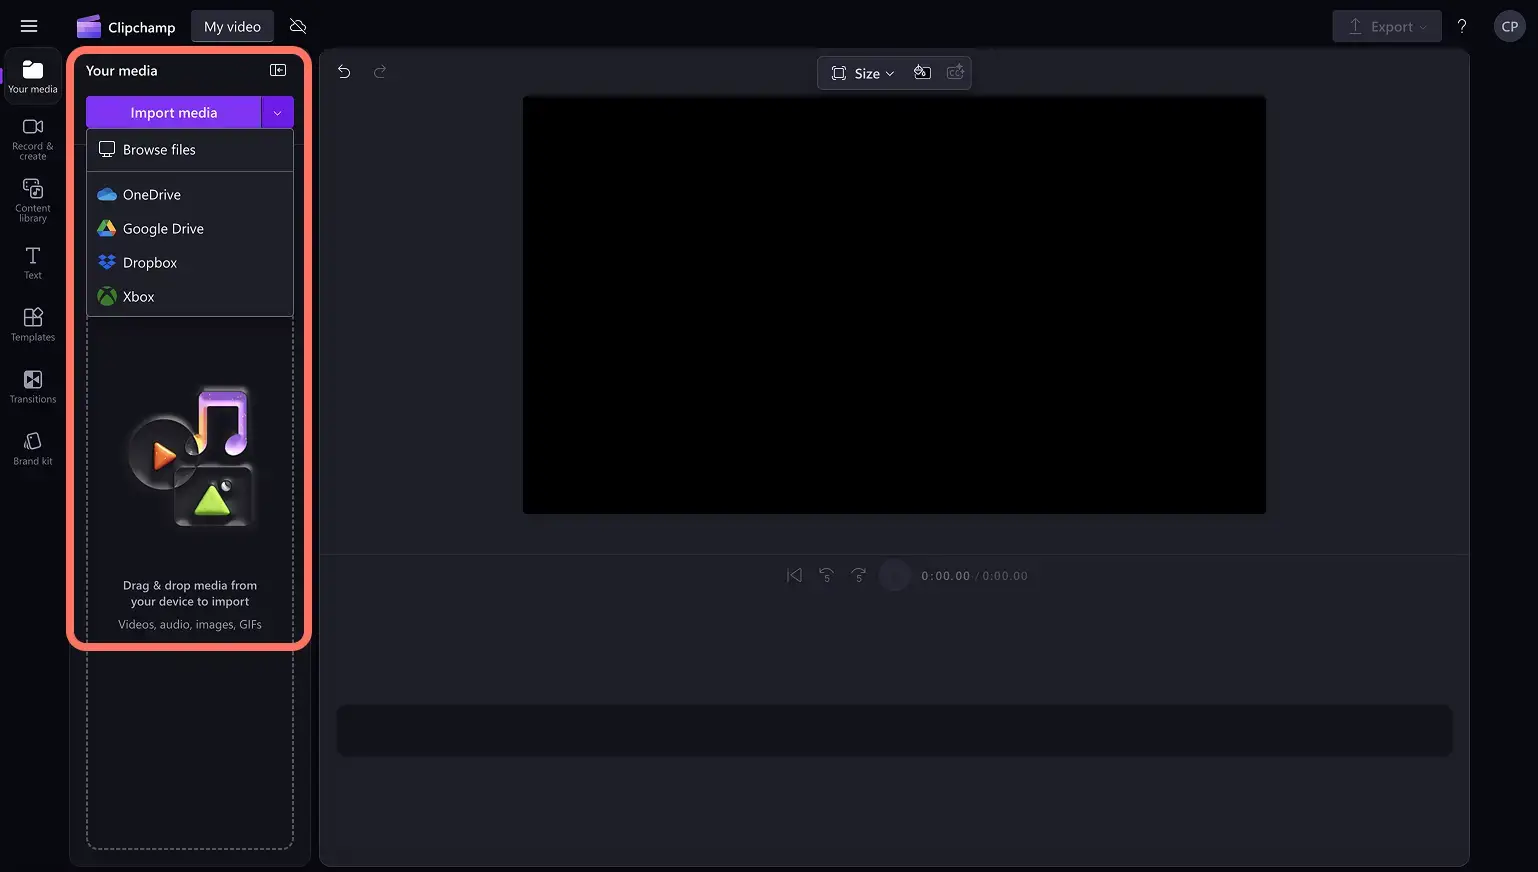
To import pre-recorded videos, click on the import media button in the your media tab on the toolbar to browse computer files or connect a OneDrive account.
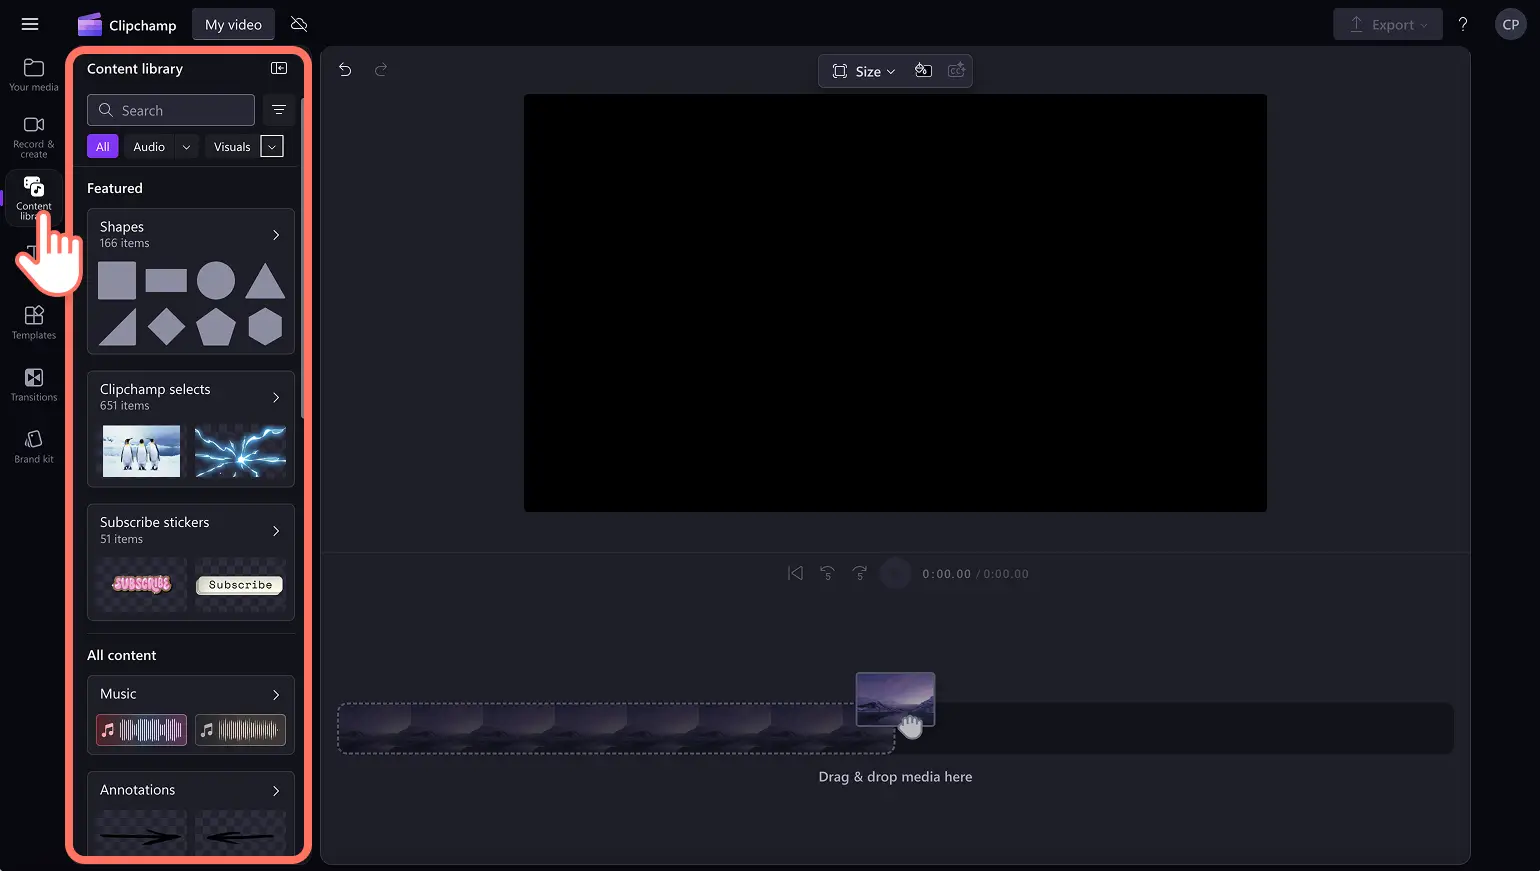
You can also use royalty-free stock media. Click on the content library tab on the toolbar and click on the visuals drop down arrow, then videos or backgrounds. Search through the different stock categories using the search bar as well.
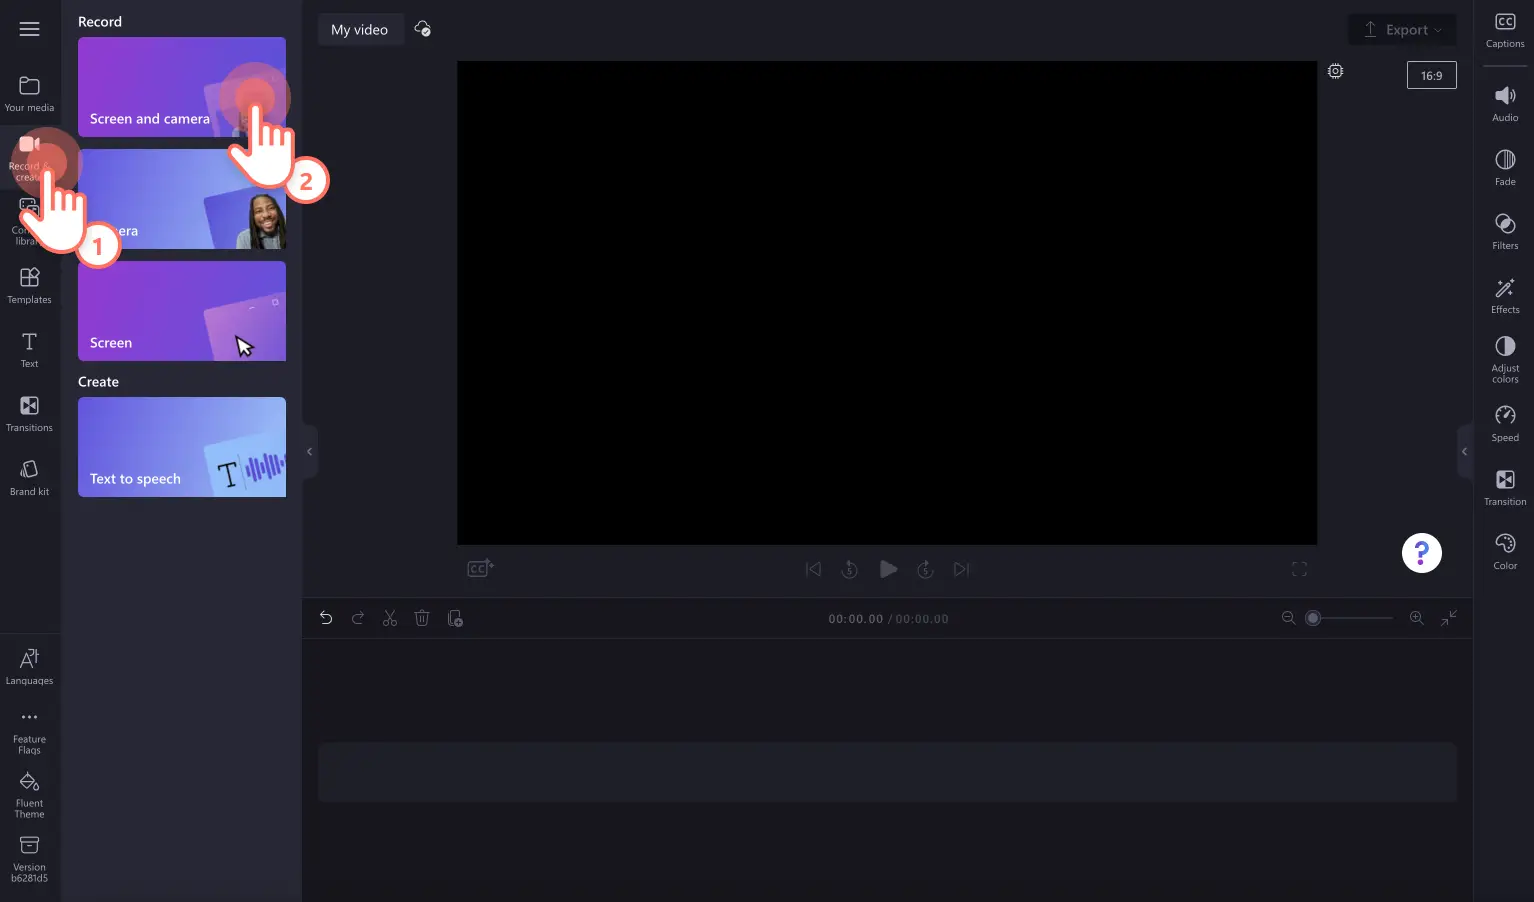
If you would like to create tutorial videos using the screen and camera recorder, click on the record and create tab, then click on the screen and camera option. Record your screen and webcam using the onscreen prompts. Once finished, the recording will automatically be added to the timeline. For more help, check out the screen and camera recording blog.
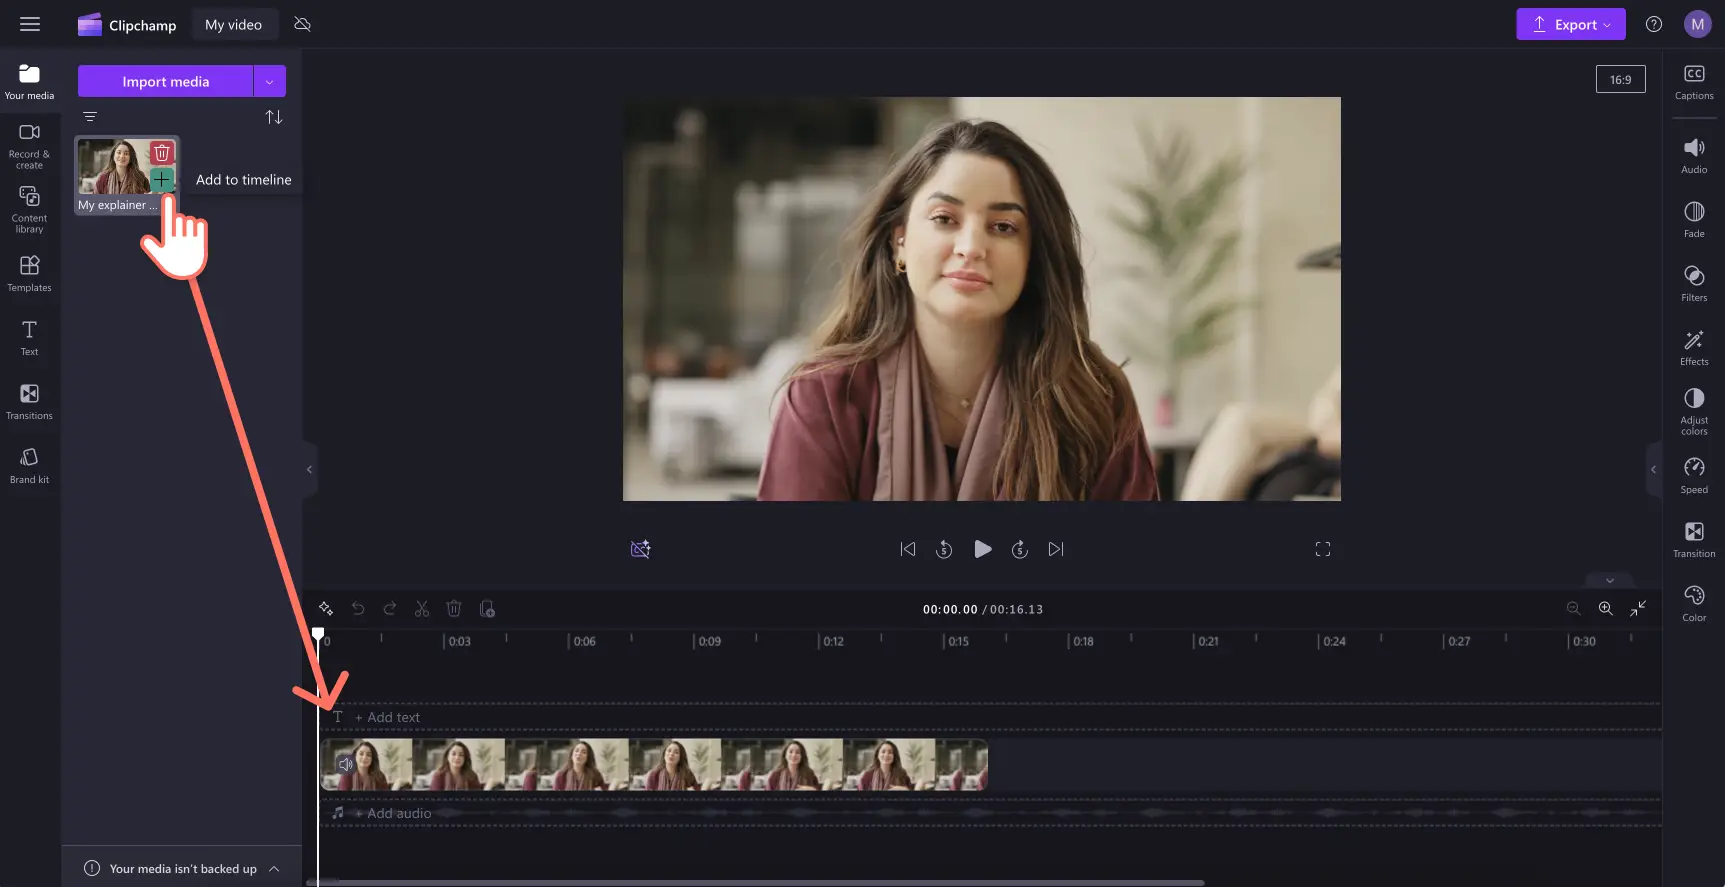
This tutorial will use footage from a webcam recording with sound.
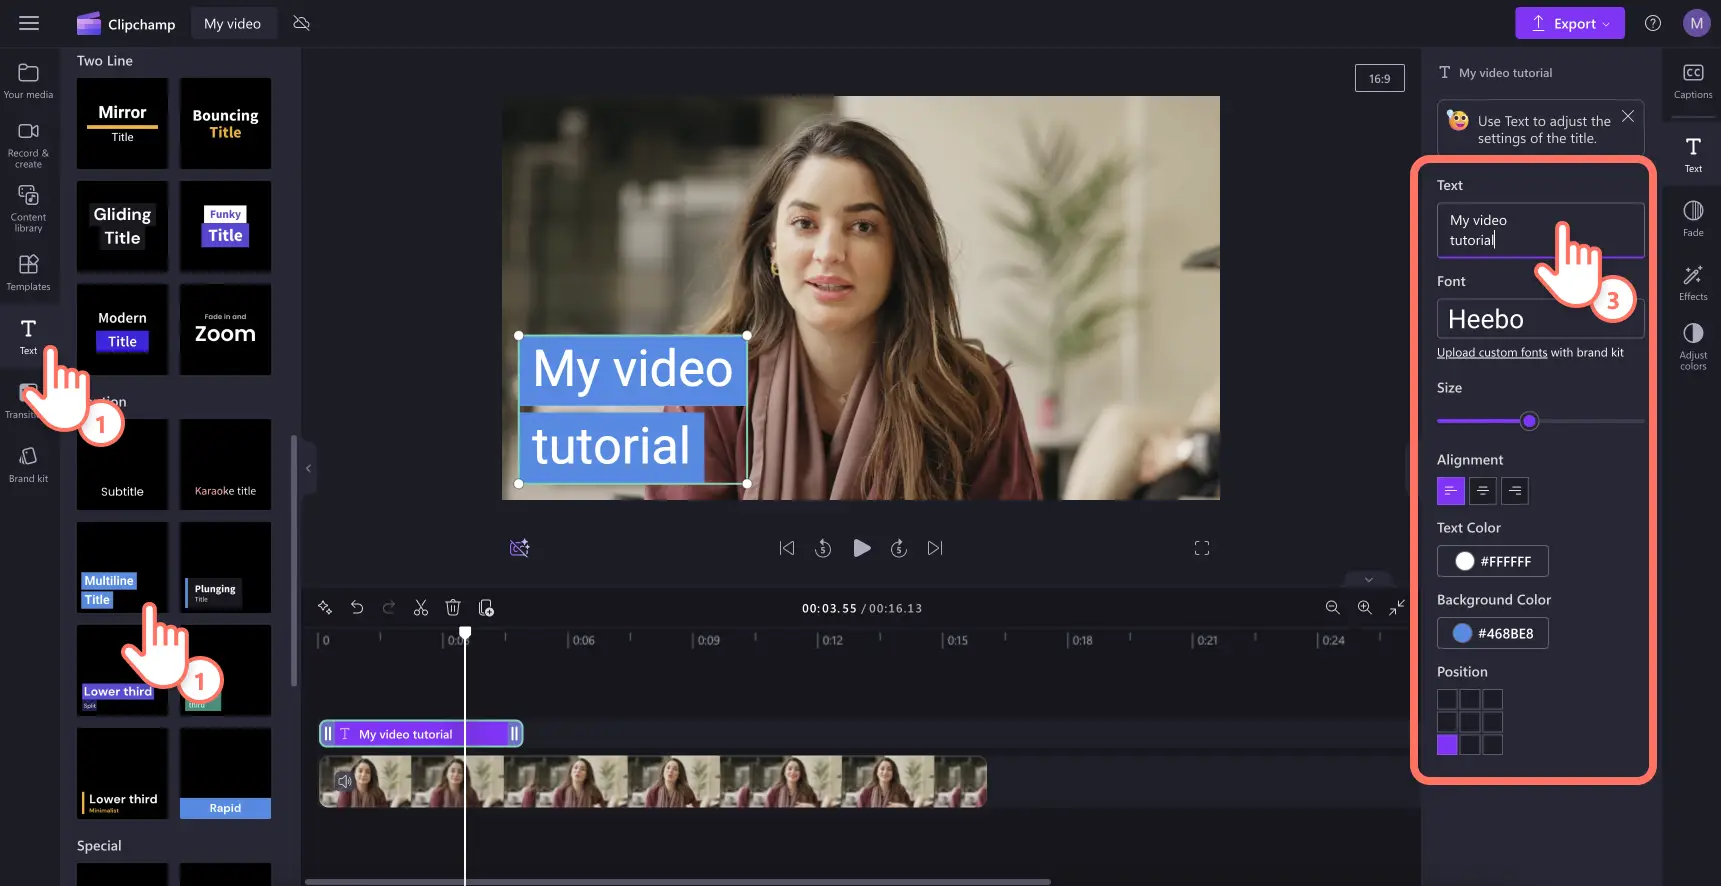
Step 2. Add visuals like text, stickers, and annotations
To add text to instructional video, click on the text tab on the toolbar, then select a title that best suits a video tutorial. We recommend using the lower third title or multi-line title. Drag and drop the title onto the timeline, then edit your text in the text tab on the property panel.
To add emojis or ASL stickers, click on the content library tab on the toolbar, then search the people stickers collections. Drag and drop a sticker onto the timeline.

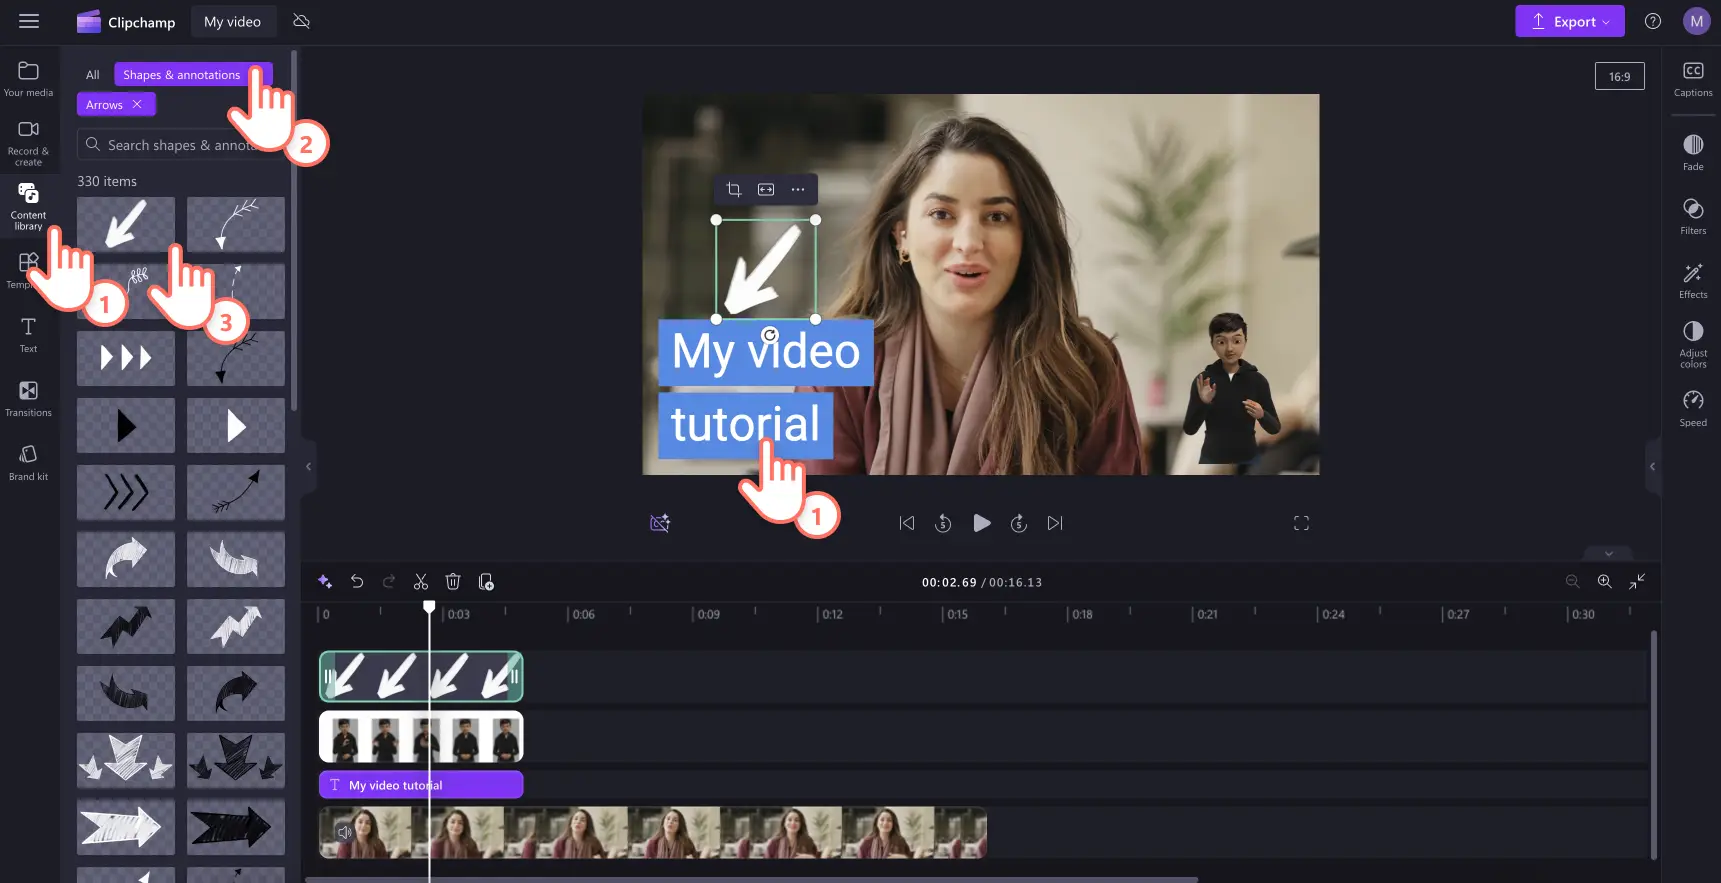
To add annotations like circles, arrows, and underlines, click on the content library tab on the toolbar, then click on the shapes and annotations tab in the drop-down menu. Drag and drop an arrow onto the timeline.
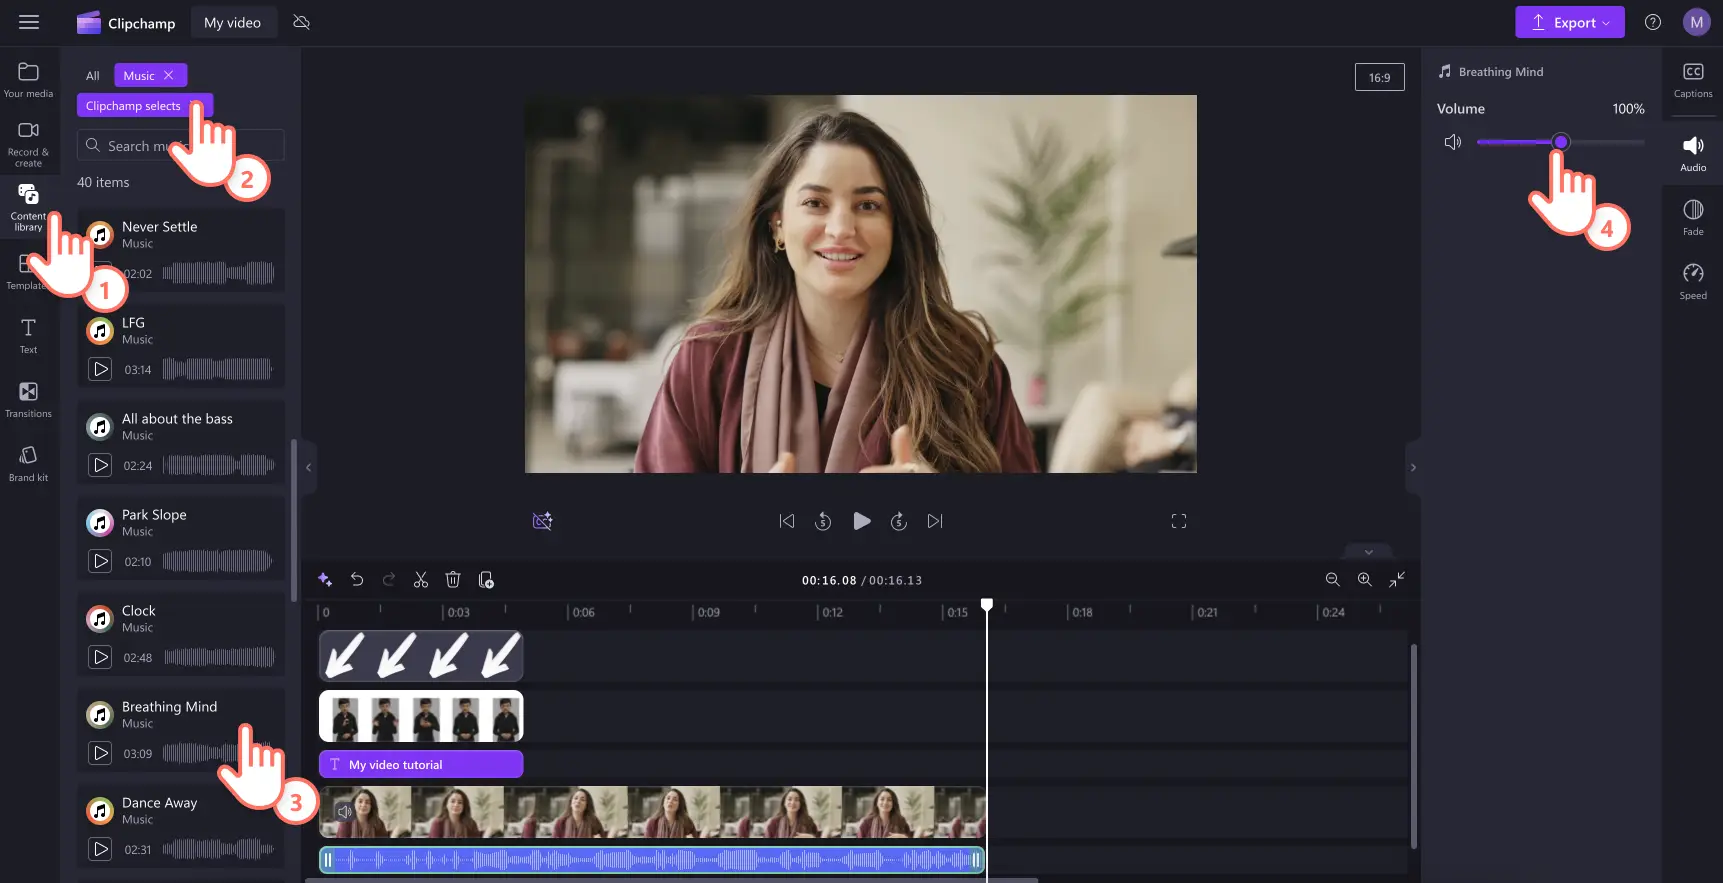
Step 3. Add background music to tutorial video
Click on the content library tab on the toolbar, then click on the audio drop-down menu and then select music. Search using keywords or scroll through the curated categories. Drag and drop your stock audio onto the timeline. Make sure to turn down the volume of your audio track using the volume slider in the volume tab on the property panel.
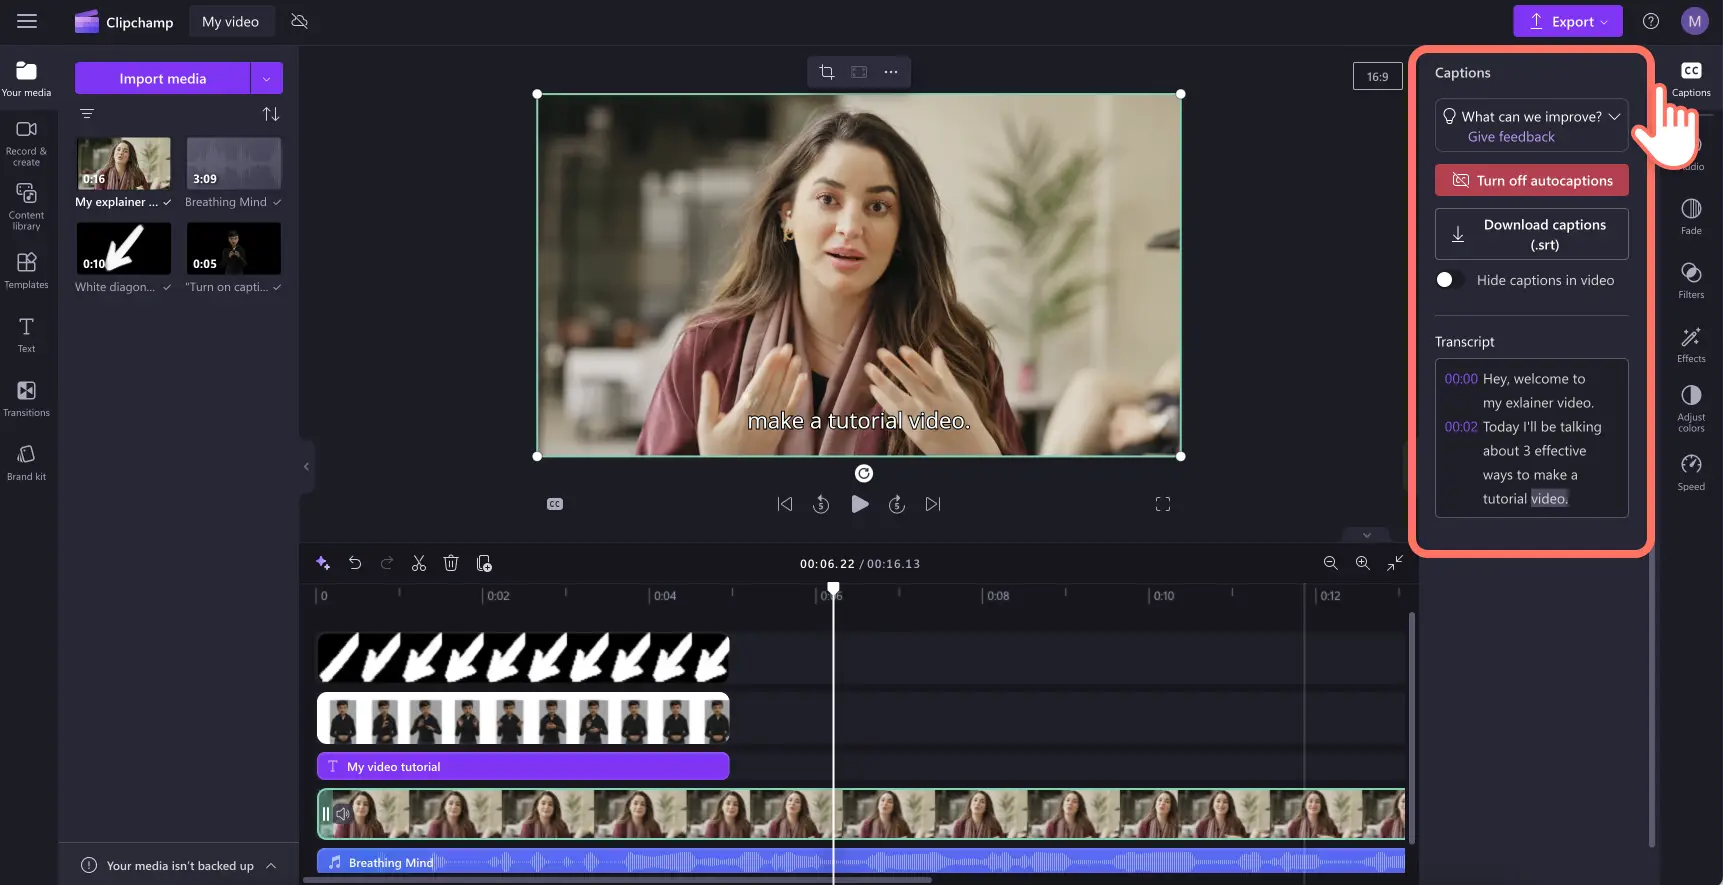
Step 4. Add AI subtitles to tutorial video
To add AI subtitles to videos, click on the captions tab on the property panel. A popup window will appear with transcribing with AI options. Select which language you would like to use and if you want to filter any profanity. When you’re ready to generate AI subtitles, click on the transcribe media button.
You will automatically return to the editor and see subtitle text being generated in the captions tab on the property panel. Generate accurate subtitles in global languages. You can also edit the font, size, alignment, colors, and position in the text tab.
Step 5. Preview and save tutorial video
Before saving a new instructional video, make sure to preview by clicking on the play button. When you’re ready to save, click on the export button and select a video resolution.
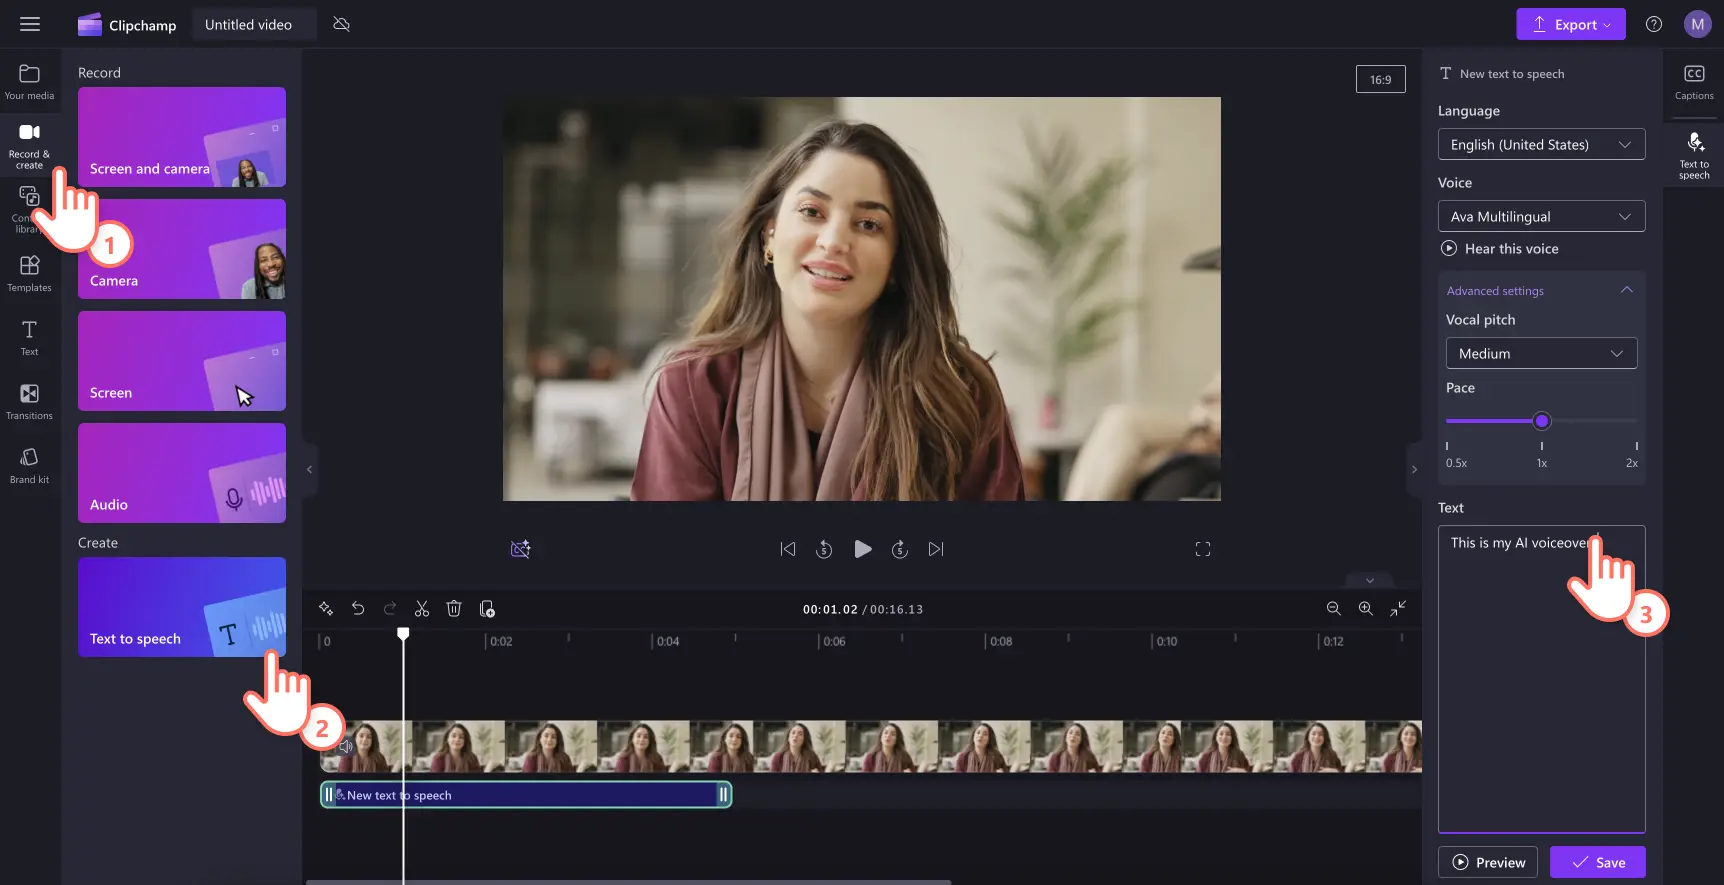
How to create an AI tutorial voiceover
If you would like to add an AI voiceover to your video, follow the steps below.
Click on the record and create tab on the toolbar.
In the property panel, select a language and AI voice.
Adjust advanced settings like pitch and pace.
Type in the text or script to generate an AI voiceover.
Preview the voiceover with video using the play button.
Save your voiceover to add it to your video editing timeline.
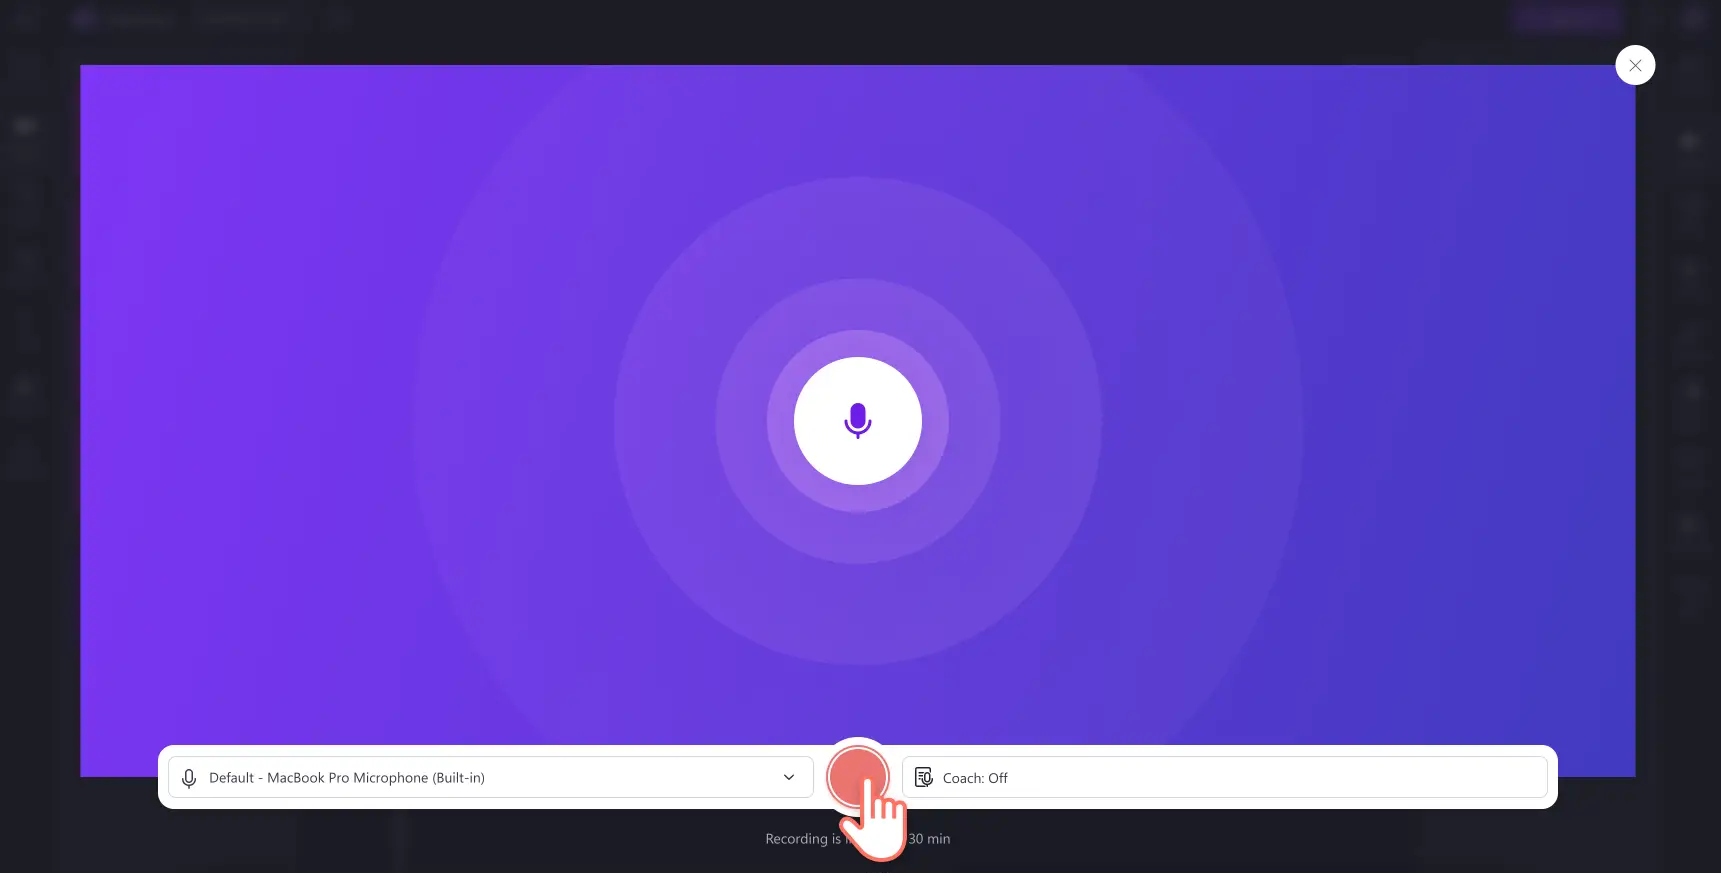
How to record your voice for a tutorial
If you would like to record a new voice narration for your video, follow the steps below. Read this blog for more guidance on how to record voice with microphone.
Click on the record and create tab on the toolbar.
Select audio to launch the voice recorder.
Enable your microphone permission in the pop-up window.
Click the red button to record.
Preview and save your audio recording to the timeline.
Learn more ways to create educational content like training videos or explore video editing tips like how to put two video side by side.
Start editing today with Clipchamp video editor or download the Microsoft Clipchamp Windows app.