Heads up! The screenshots in this article are from Clipchamp for personal accounts. The same principles apply to Clipchamp for work and school accounts.
On this page
- What is a reaction video?
- Top genres for reaction videos
- Choosing a reaction video format
- YouTube reaction video specifications
- How to make a reaction video
- How to make a reaction video for YouTube Shorts
- Add special effects to your reaction video
- Best reaction video channels for inspiration
- Repurposing and resharing reaction videos
- Copyright rules and avoiding strikes
- Watch how to edit reaction videos tutorial
Ever laughed out loud at a meme compilation, screamed at a shocking movie twist, or celebrated a mind-blowing gaming moment—only to wish you could see how others reacted too? That’s exactly why reaction videos have taken over YouTube, TikTok, and beyond.
It's easier than ever to make a reaction video with an online video editor, whether you want to share an over-the-top expressions or an insightful breakdown. Learn how to record your screen and camera to make an entertaining reaction videos using Clipchamp video editor.
What is a reaction video?
A reaction video is a type of content where creators film their real-time responses to various media, like music videos, movie scenes, memes, or those bizarre viral clips that make you question humanity. Successful reaction videos thrive on relatability—audiences love watching others laugh, cringe, or totally freak out over the same content they love (or passionately dislike). Reaction videos are easy to produce by recording a reaction using an online webcam recorder, and adding it as an overlay or side by side to the original video.
Top genres for reaction videos
Reaction videos come in all shapes and sizes, but some genres consistently grab attention and rack up millions of views. Choosing the right niche can help you attract the right audience and keep them coming back for more. Here are some of the most popular types of reaction videos:
Viral meme and internet trend reactions
The internet moves fast, and reaction videos help creators jump on trends quickly. Reacting to viral TikTok challenges, funny memes, or internet drama keeps content fresh and relatable.
Music video reactions
Watching someone’s first-time reaction to a hit song or music video is always entertaining. Whether it’s breaking down lyrics, appreciating vocal techniques, or just vibing to the beat, music reaction videos are a huge hit. It especially works well with passionate fanbases like K-pop, rap, and classic rock lovers.
Movie and TV scene reactions
From shocking plot twists to emotional endings, movie and TV reactions keep audiences engaged. People love watching others experience cinema betrayals, post-credit scenes, or horror jump scares for the first time.
Gaming reactions
Gaming reactions range from live reactions to new game trailers to first-time gameplay videos of iconic games. Many creators also react to rage-quitting fails, speedruns, or shocking in-game moments.
Comedy and skit reactions
Some reaction channels specialize in reacting to stand-up comedy, parody videos, or hilarious fails. These videos thrive on exaggerated expressions and witty commentary.
Choosing a reaction video format
Before you start creating your very own reaction videos, it’s important to decide on the right format. Reaction videos come in different styles, and your choice will depend on the platform, content type, and how much time you can spend on video editing.
YouTube long-form or Shorts and TikTok reactions
Not all reaction videos are created equal—some work best as full-length YouTube videos, while others thrive in short-form formats like YouTube Shorts, TikTok, or Instagram Reels.
YouTube long-form reaction videos (8+ minutes) allow for in-depth analysis, commentary, and storytelling. These are perfect for TV shows, music videos, and gaming reactions—or if you just like hearing yourself talk.
Short-form reactions (TikTok, YouTube Shorts, X video) are quick, snappy, and rely on high-energy expressions and fast cuts. These are great for meme reactions, viral trends, or awkward fails that don’t need an hour-long breakdown.
Live stream reactions (on Twitch or YouTube Live) let creators react in real time to game trailers, award shows, or breaking news, making them super interactive—because nothing beats a raw, unfiltered “OMG” moment.
Solo or group reaction formats
Solo reaction videos are the most common and easiest to produce. Just hit record and let your face do the talking.
Group reaction videos (featuring friends, family, or co-hosts) add different perspectives, humor, and energy. They also help soften the embarrassment when you scream at a jump scare.
Editing styles for reaction videos
Editing can transform a simple recording into an engaging, dynamic video. Some reaction video editing techniques include:
Picture-in-picture (PIP): the classic format where the reaction is in a small box while the main content plays.
Split screen: where both the reaction and original content are side by side, because why make viewers choose?
Jump cuts & zoom-ins: perfect for emphasizing dramatic gasps, epic fails, or that moment you realize you forgot to hit record.
Text & emoji overlays: adding captions, effects, or memes enhances engagement—because sometimes words don’t do your reaction justice.
YouTube reaction video specifications
We recommend following these YouTube video specifications when creating your reaction video.
Video length: 3-5 minutes with verified creators up to 15 minutes
Video file size: 128GB
Video format: MP4 is recommended
Video dimensions: 1080 x 1920
Video aspect ratio: 16:9 widescreen
We recommend following these specifications if you’re creating reaction videos for YouTube Shorts.
Video length: 60 seconds
Video format: MP4 is recommended
Video dimensions: 1920 x 1080
Video aspect ratio: 9:16 portrait
How to make a reaction video
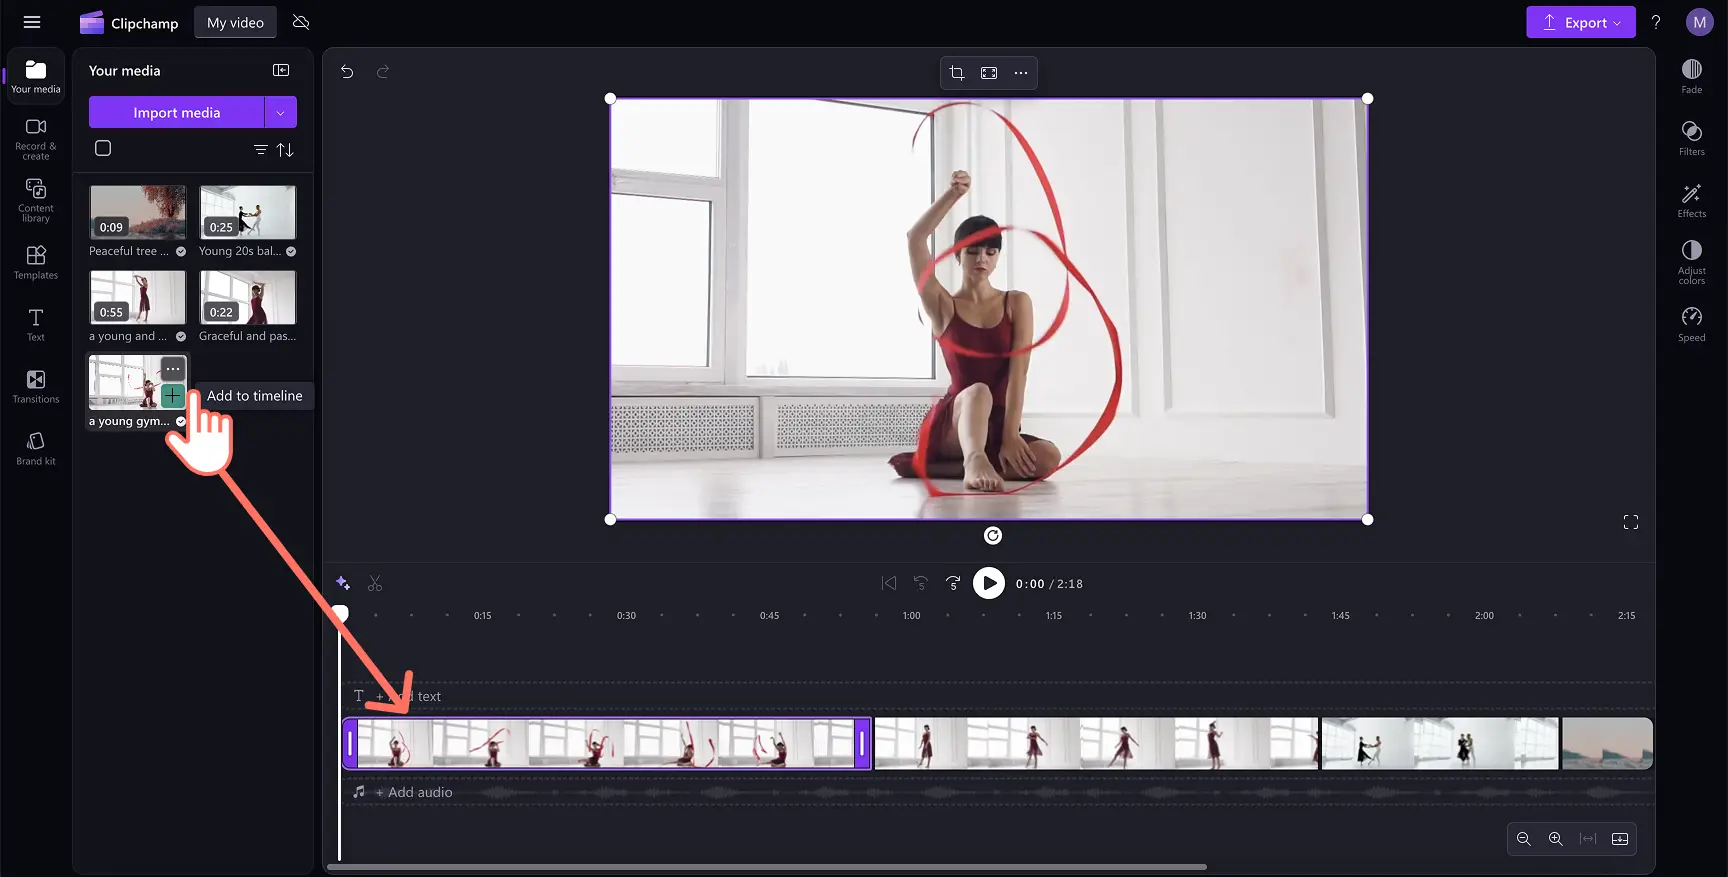
Step 1. Upload your video
To import your own videos, photos, and audio, click on the import media button in the your media tab on the toolbar to browse your computer files, or connect your OneDrive.
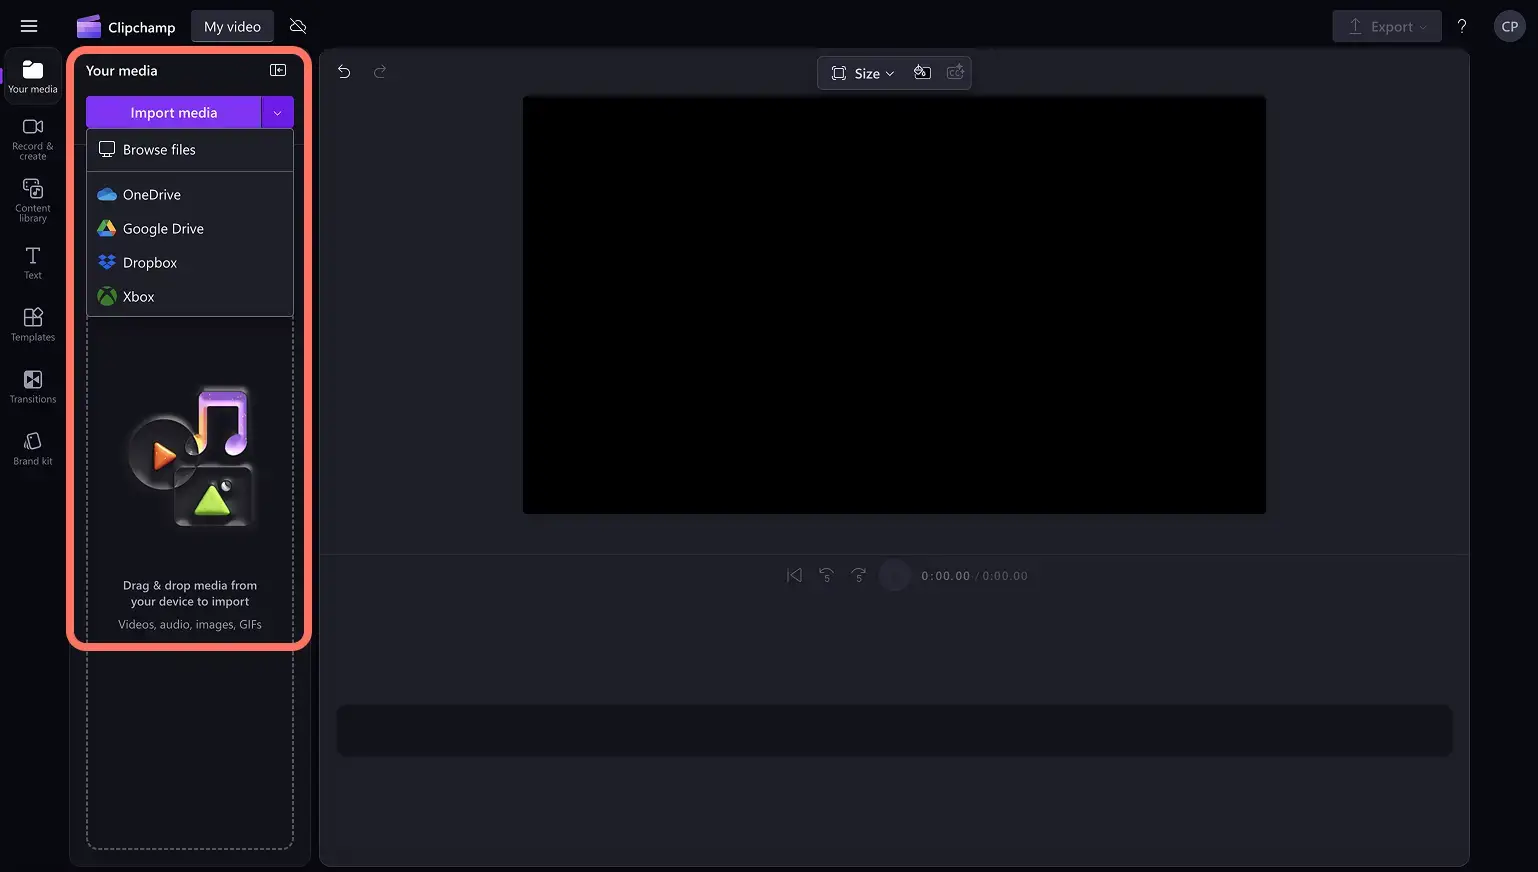
If you’re reacting to a YouTube video, make sure you've downloaded the content following all of YouTube's copyright rules. Drag and drop the video onto the timeline or click on the add to timeline button.
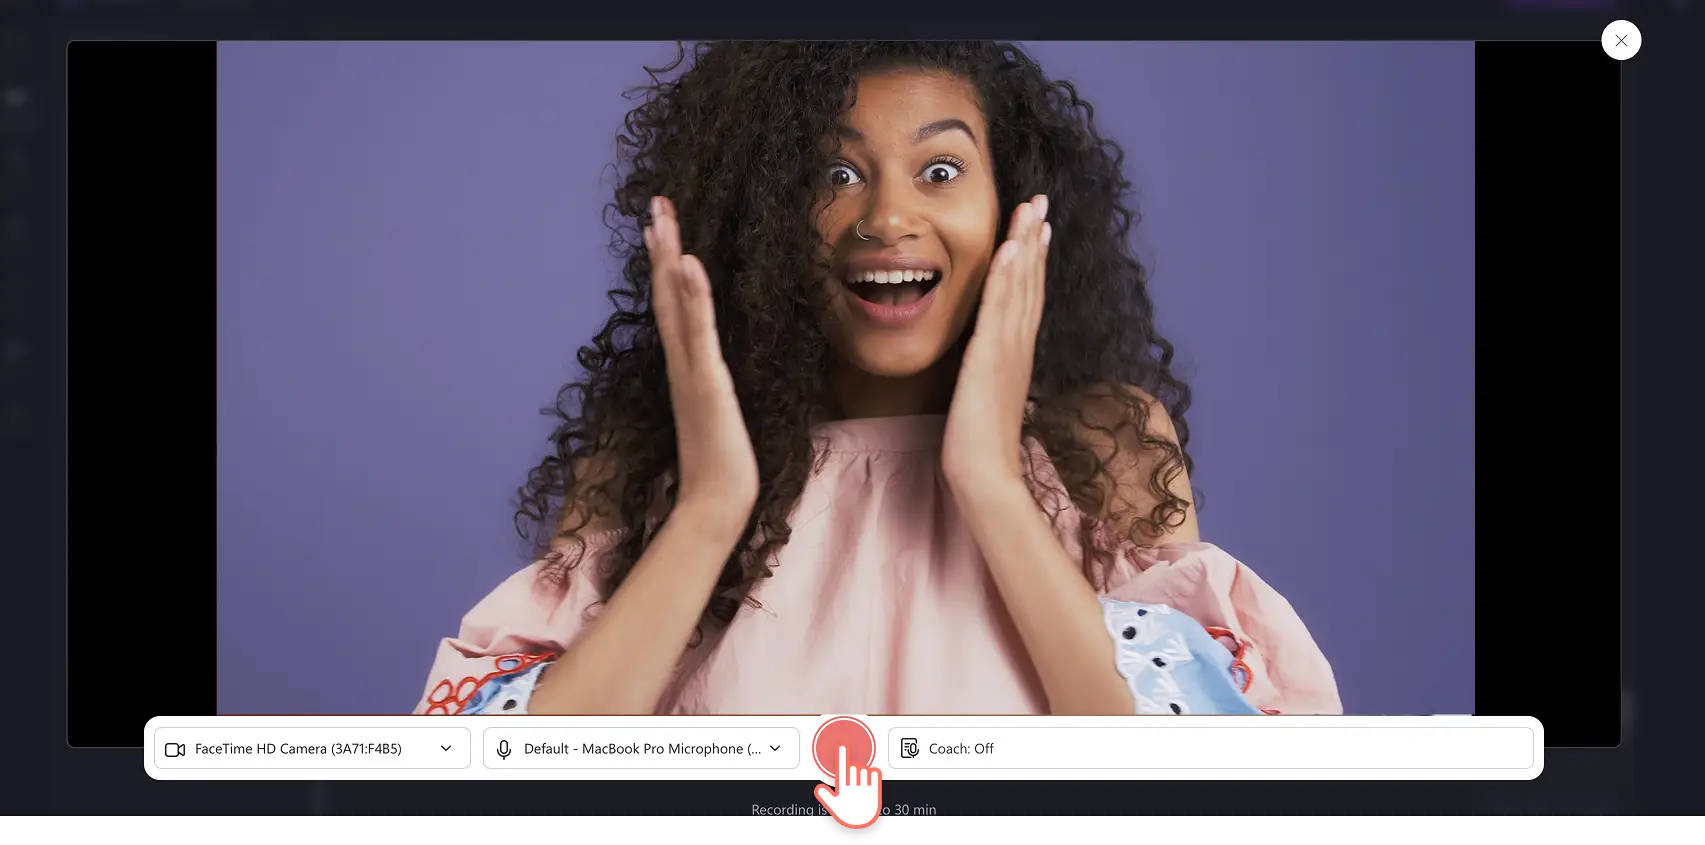
Step 2. Create a webcam video
Click on the record & create tab on the toolbar, then click on the camera button. A popup window will appear to start recording. Click on the allow button to enable access to your camera and microphone. To start and stop recording, click on the red record button. You can record upto 30 minutes of webcam video at a time.
Review your recording and click the save and edit button to automatically add your reaction video to the editing timeline. The recording will also save into the your media tab.
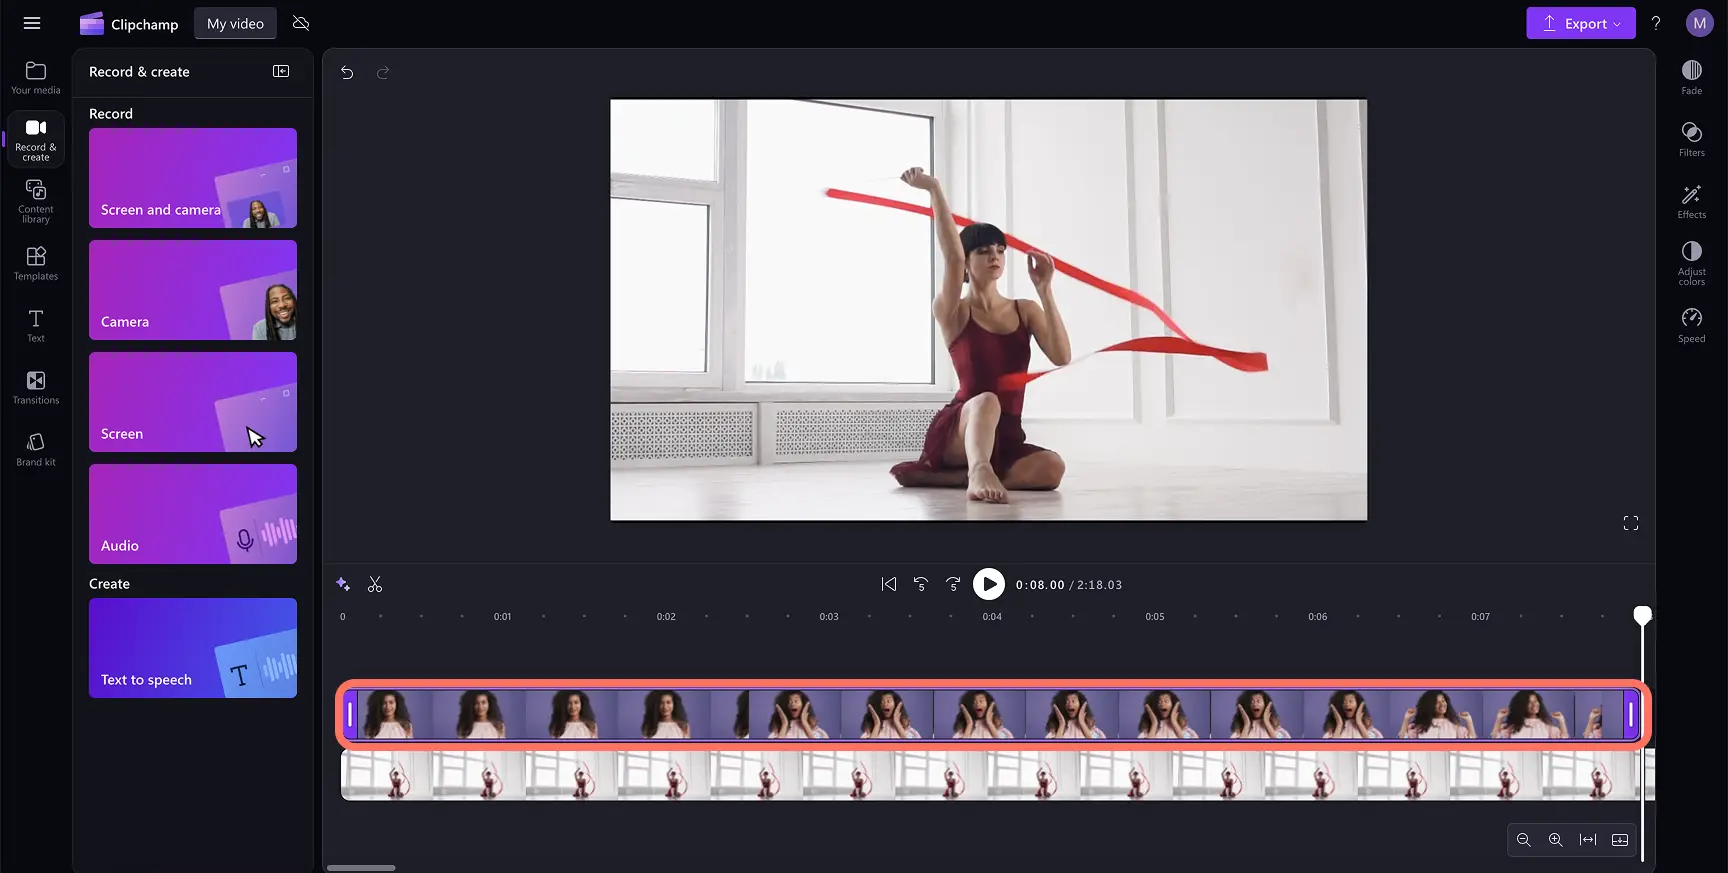
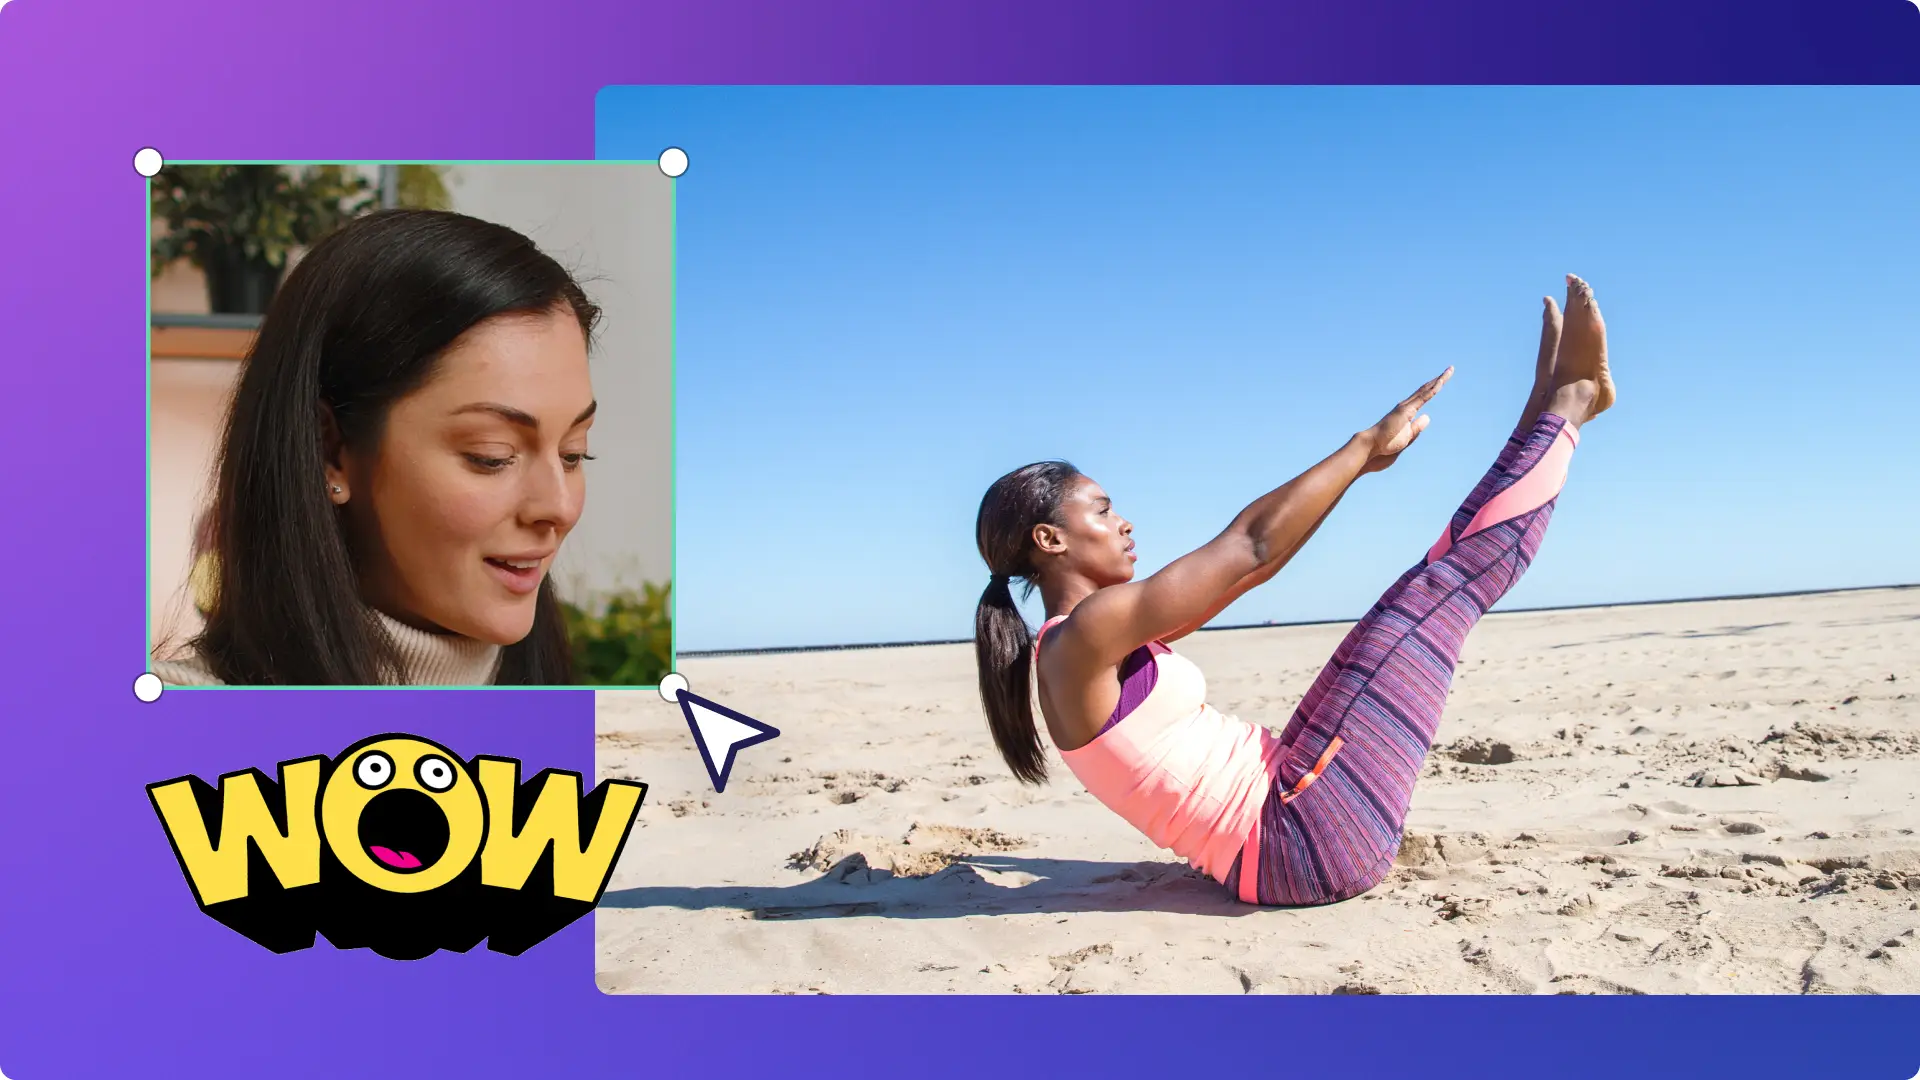
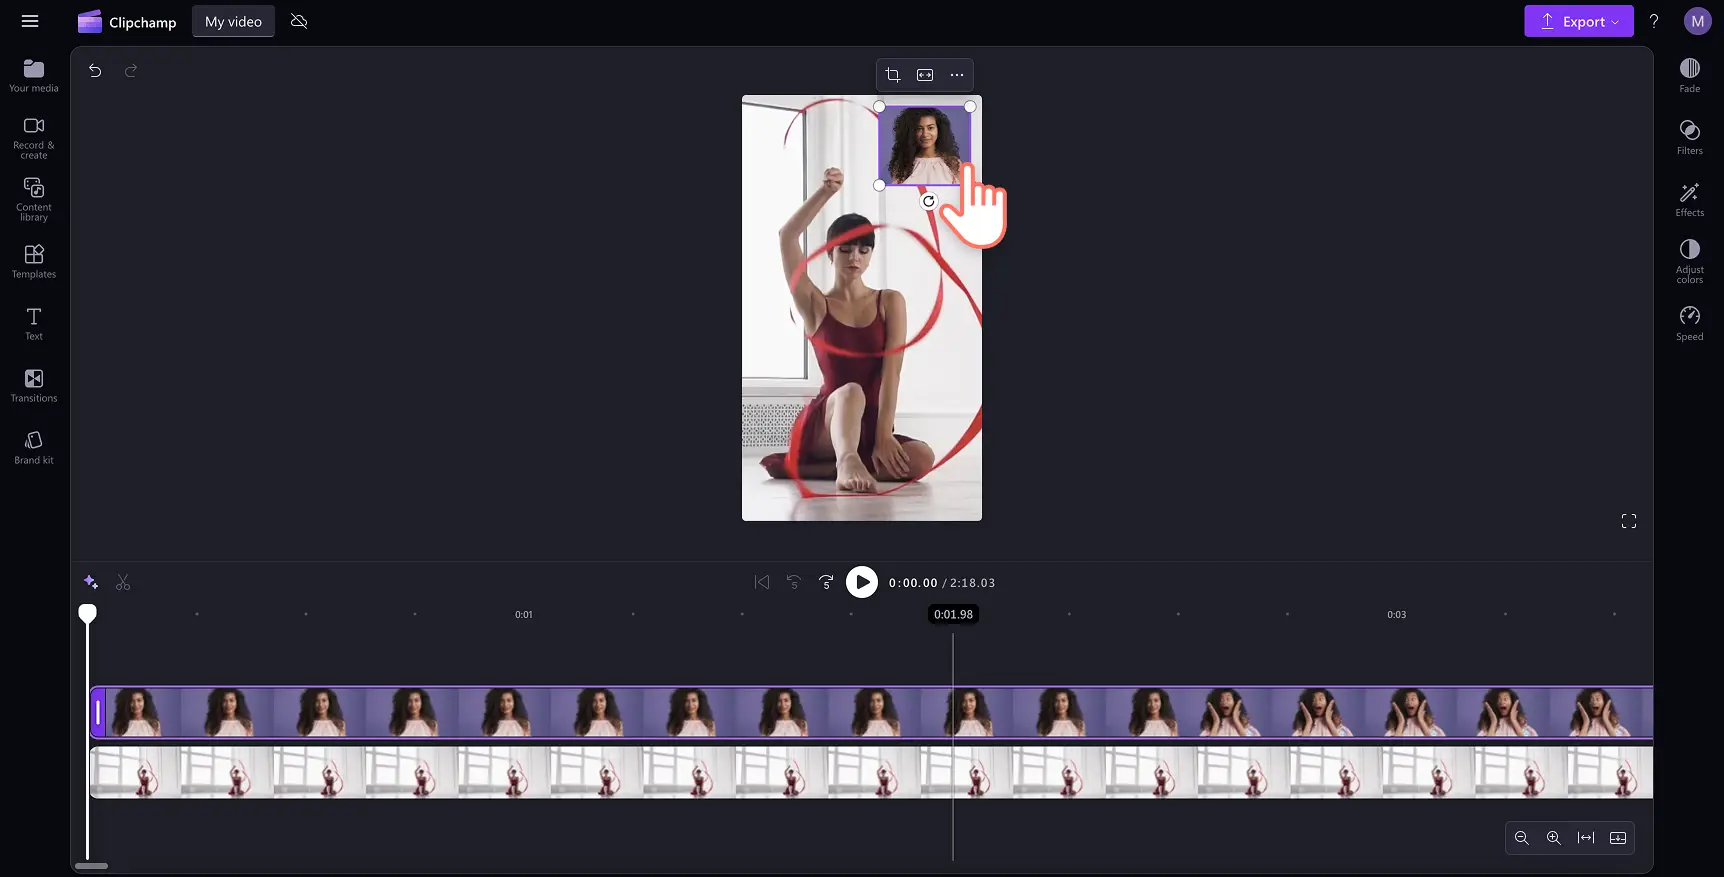
Step 3. Create a picture in picture effect
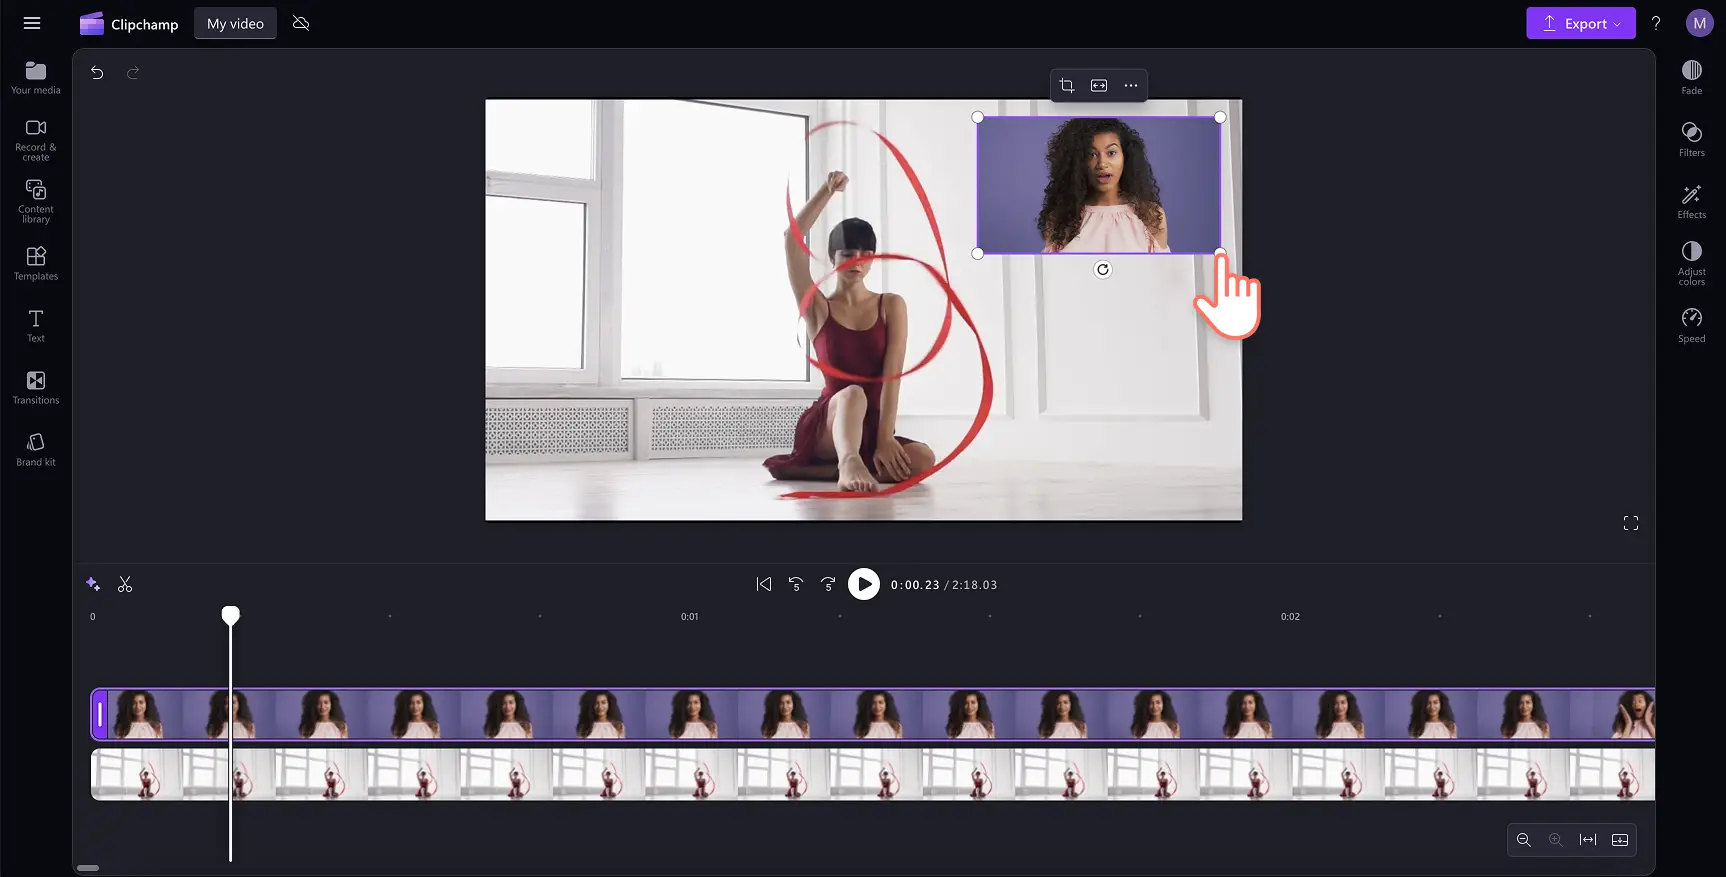
In the timeline, place your webcam recording video above the clip you are reacting to. Select the video and use the floating toolbar to edit the positioning of your webcam video. Click on the three dots then click on the picture in picture button. Choose from a variety of preset video positions such as top right, top left, bottom right, or bottom left. You can also highlight the clip and drag the position around freely on the video preview if you don't want to use a preset position.
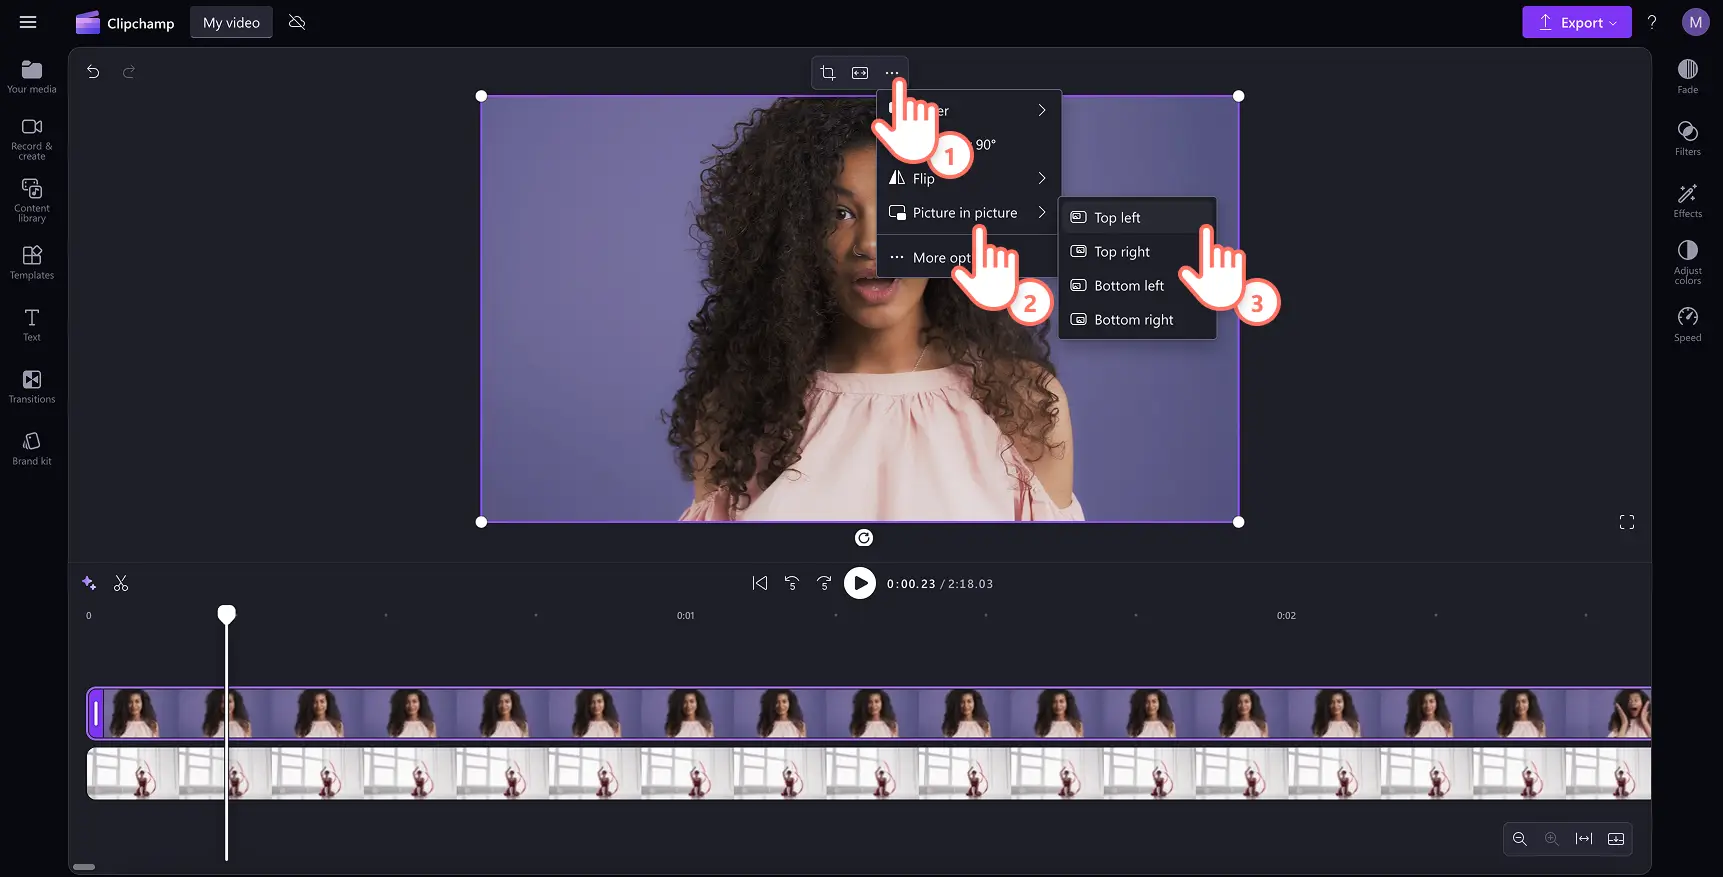
To adjust the size of the video, highlight the video and drag the corners in and out to increase or decrease the size.
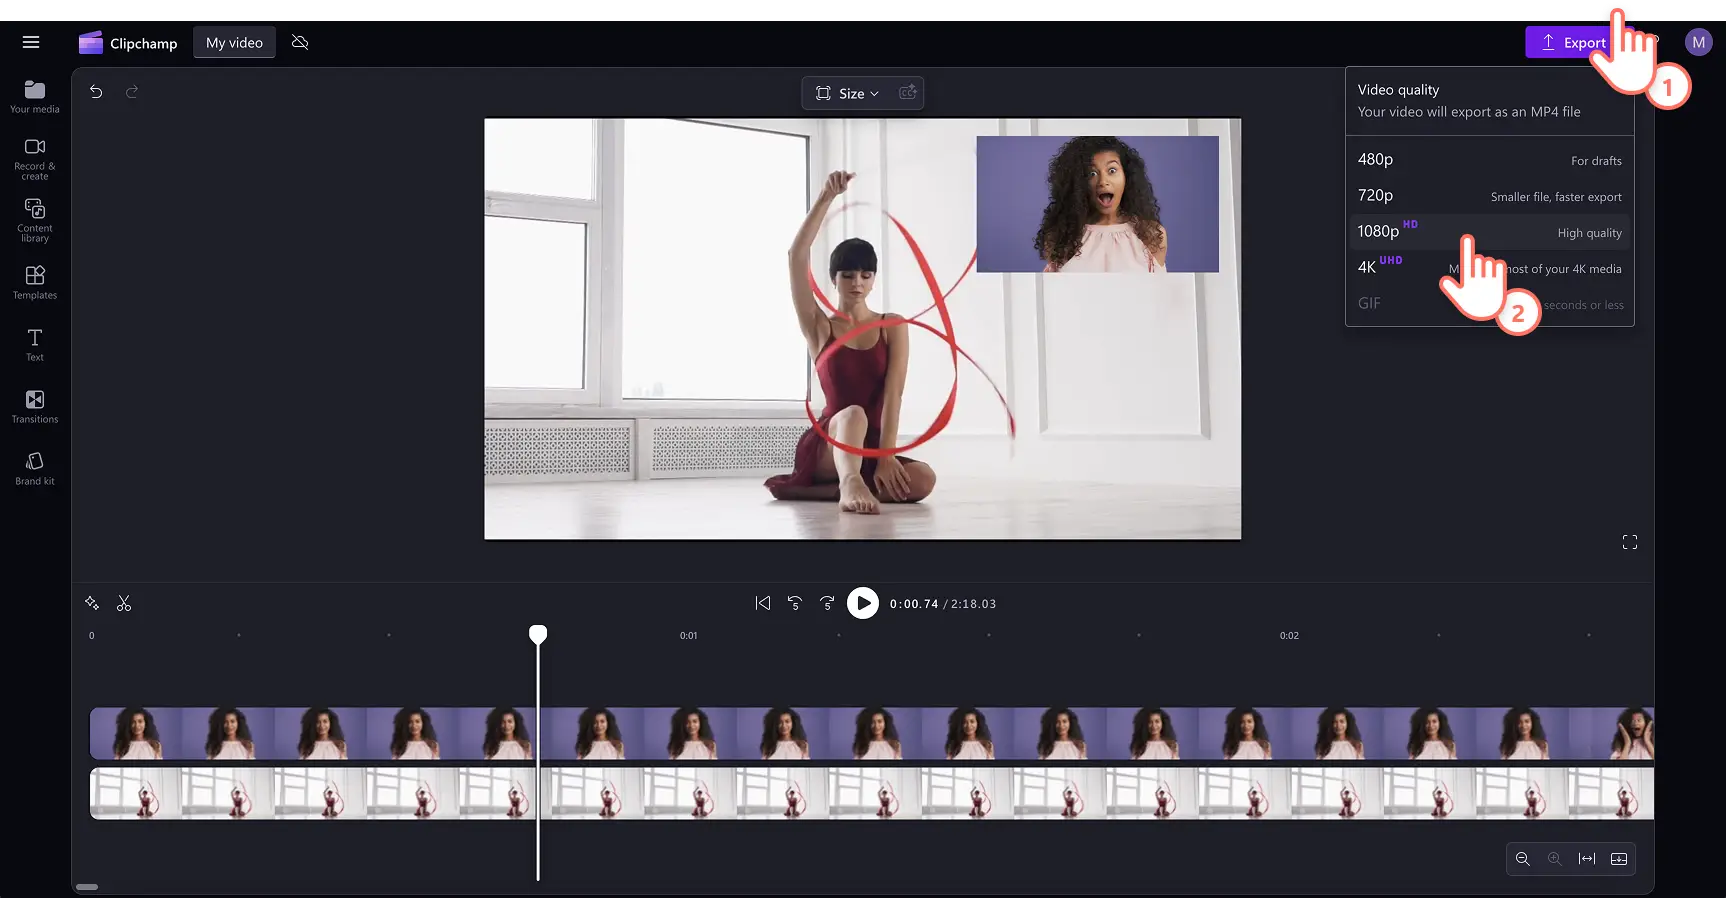
Step 4. Preview and save your video
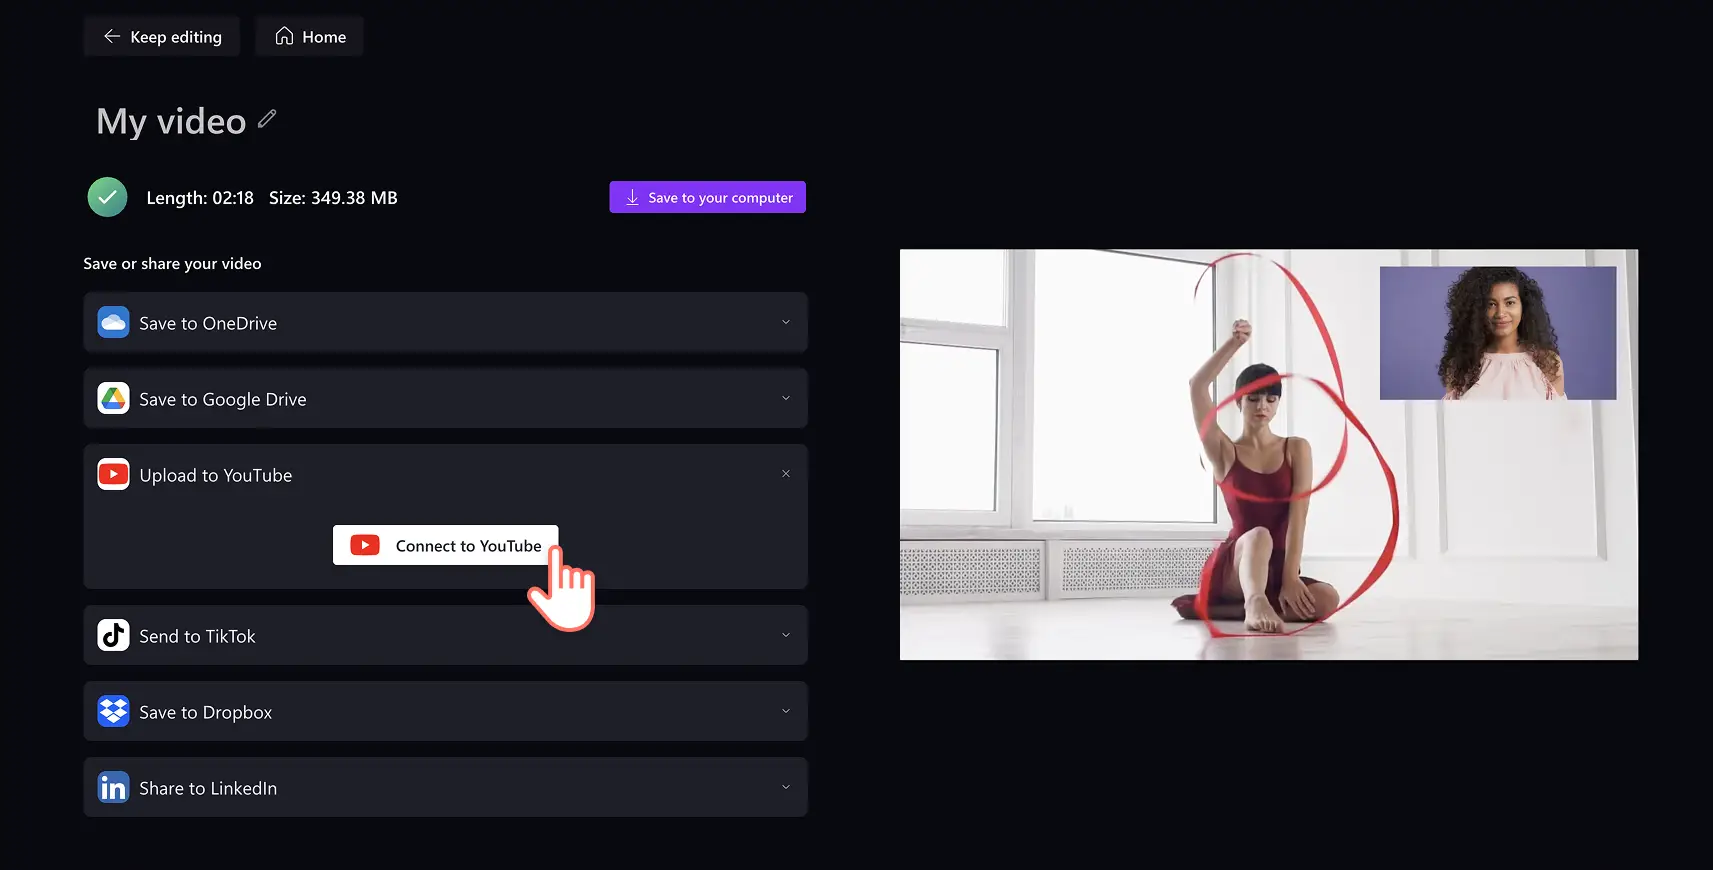
Before saving your new picture-in-picture video, make sure to preview by clicking on the play button. When you’re ready to save, click on the export button and select a video resolution.
Using the helpful YouTube integration to share your reaction video to YouTube directly from Clipchamp.
How to make a reaction video for YouTube Shorts
Easily repost videos to YouTube Shorts using the online video resizer. Make your video fit every time by using the preset aspect ratios like 16:9 for YouTube and 9:16 for TikTok, YouTube Shorts, and Stories.
The default size for all new videos in Clipchamp is the 16:9 ratio, but you can easily change video dimensions before or during editing. Click on the size button in the floating toolbar above the video preview. Ensure no items in the timeline have been selected in order to reveal the list of aspect ratio presets. Next, select vertical 9:16 to change the video's aspect ratio.
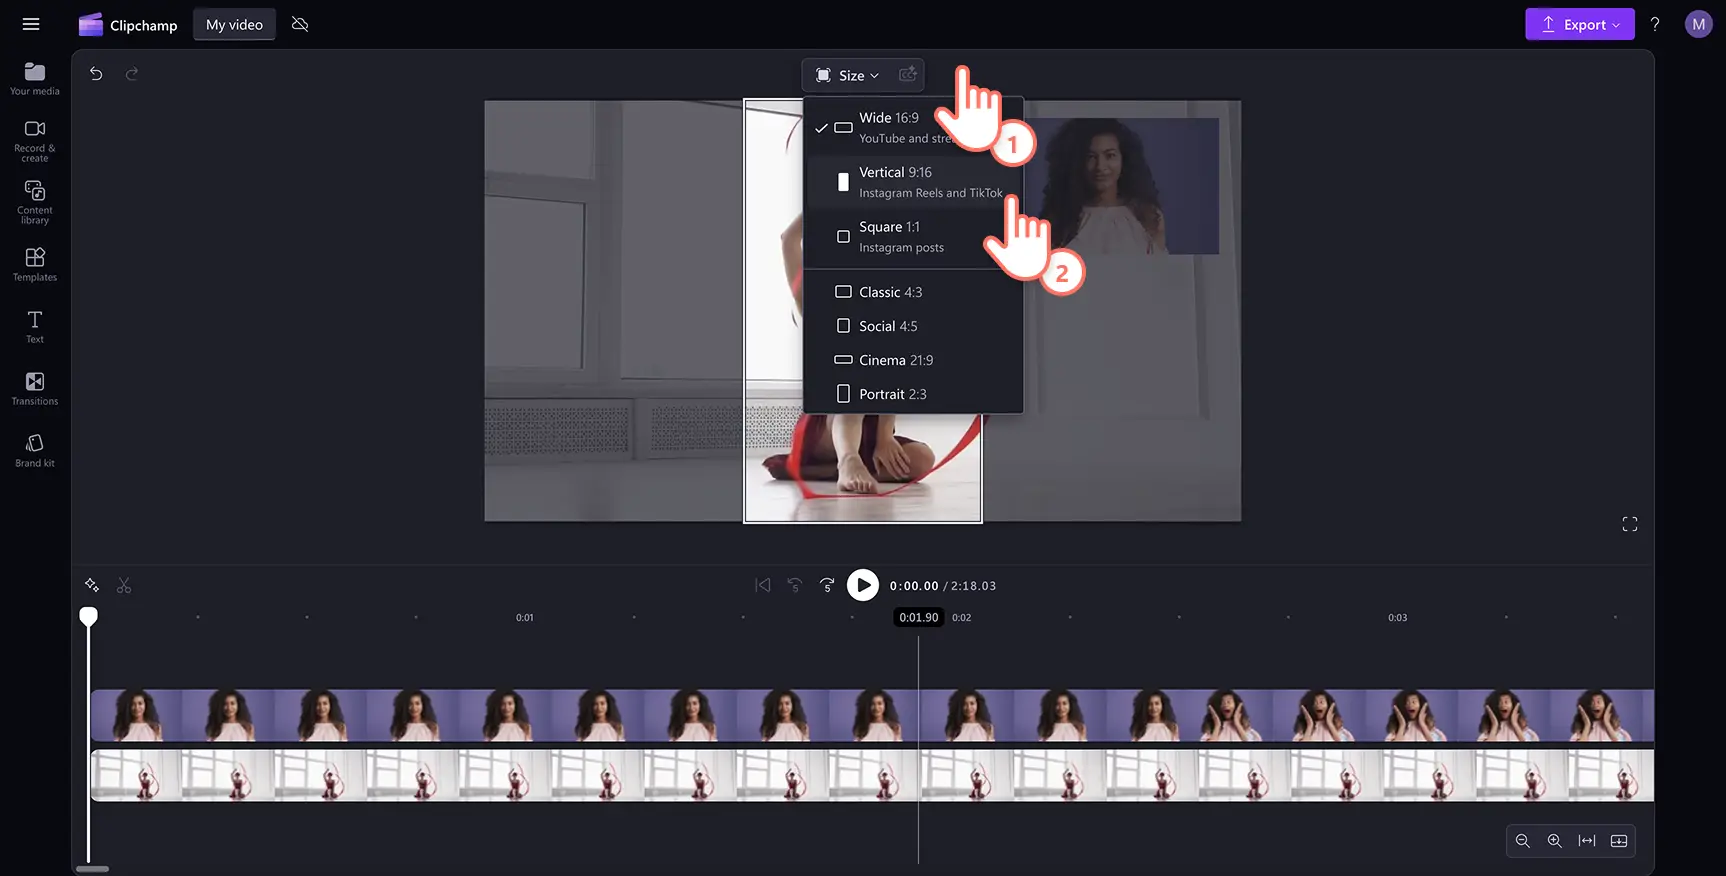
The video will be resized to the new aspect ratio. If your video gets cropped or has black bars after resizing, click on the fill button on the floating toolbar in the stage. Lastly, adjust your webcam video’s position in the video preview if needed, then save and share your video on social media.
Add special effects to your reaction video
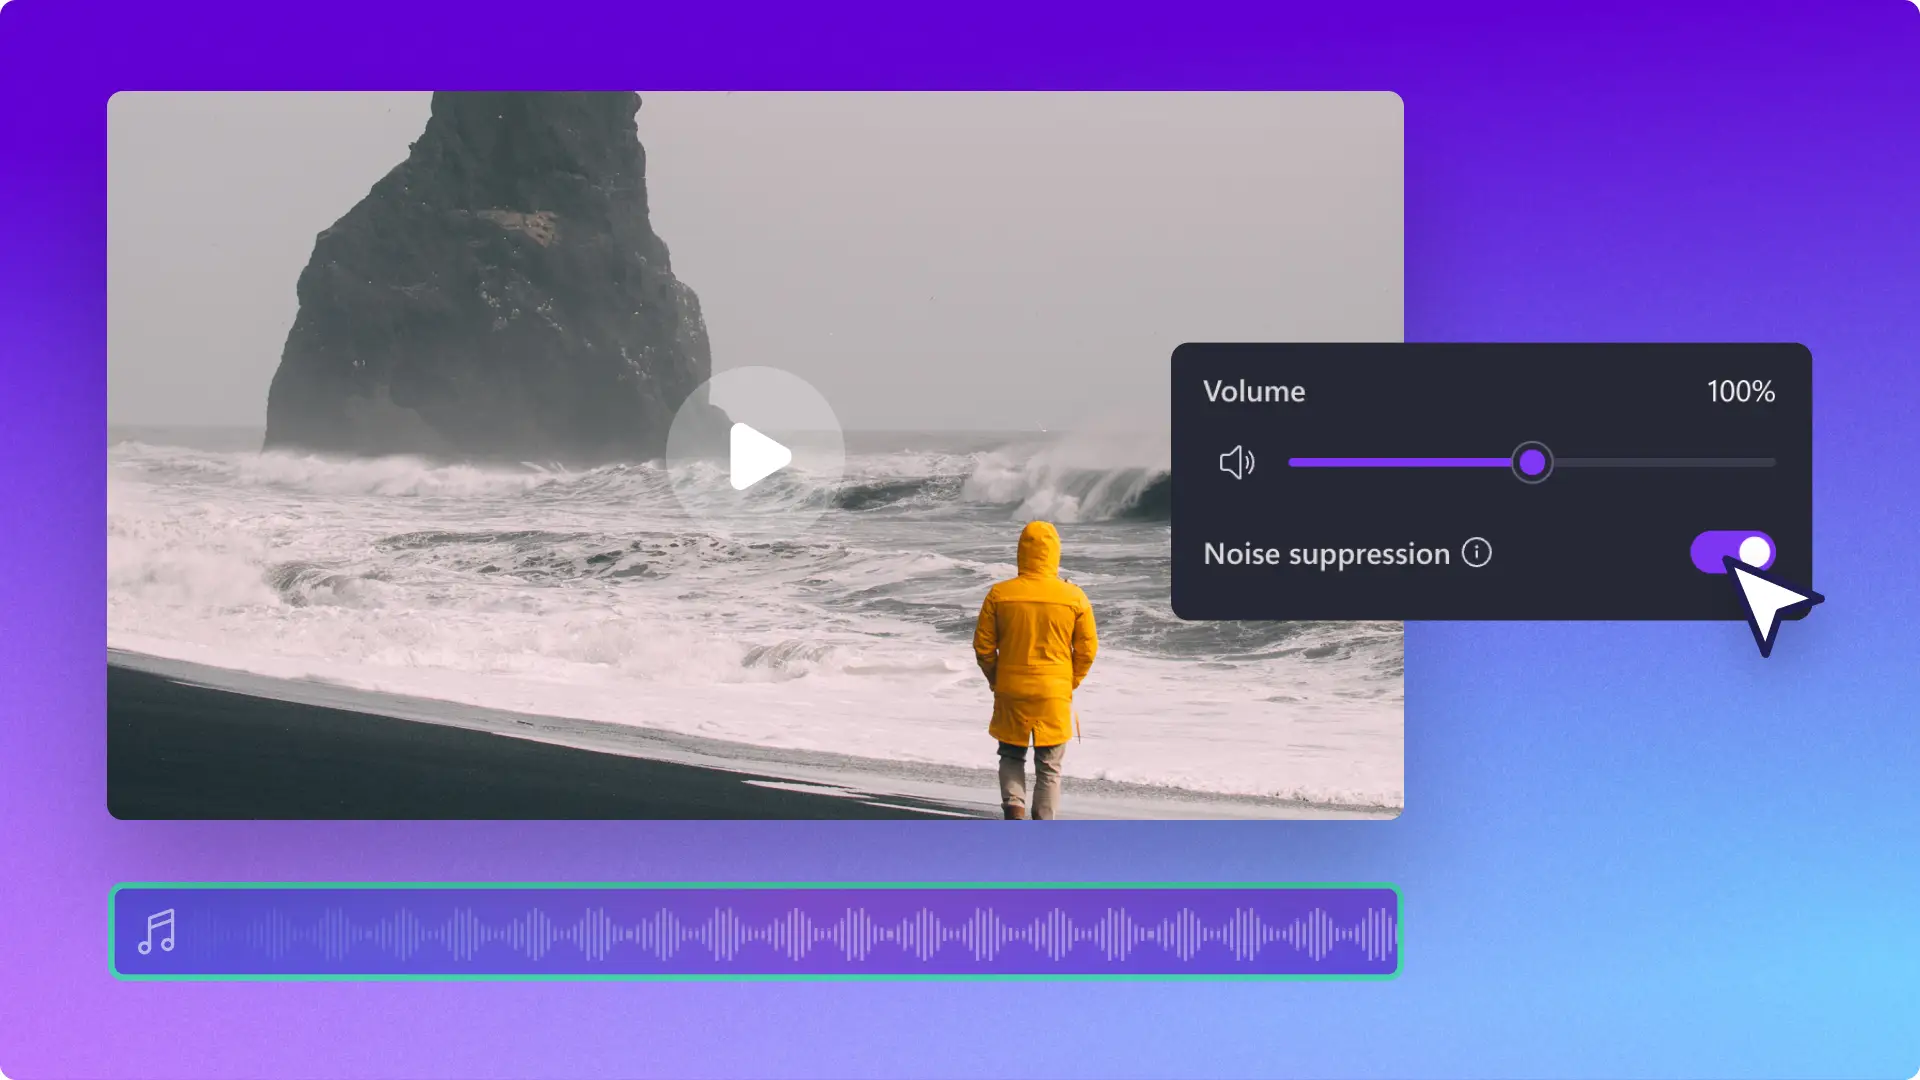
Clean audio with noise suppression
You don’t need a professional microphone for clear and crisp audio. Remove unwanted background and room echo with noise suppression. Just separate your video from audio then toggle on noise suppression without affecting the clarity of your vocals.
Generate subtitles
Make your YouTube reaction video more accessible and easier to follow on mute with autocaptions. Using the auto-captions feature, you can generate subtitles in just a few seconds, personalize the captions style, and even download a transcript of your video.
Overlay animated text and titles
Drag and drop a motion title onto your reaction video to inform your viewers of a video's title, username, social media stickers, expressions, and more. Choose from a wide range of colors, fonts, sizes, and positions for the text overlay to suit your reaction video.
Connect videos with transitions
Make your reaction video look more polished and professional by adding quality transitions between video clips. Choose scene transitions like fade-out, spin, jump cut, swipe, glitch, and more. Just drag and drop a transition onto the timeline between two clips to apply.
Customize with intro and outros for YouTube
Keep your YouTube reaction videos consistent and attention grabbing with an intro and outro video. Use a ready-made intro or outro video template, customize with your YouTube aesthetic and text, then save in HD 1080p. You can even add royalty-free background jingles to your intro and outro clips to make your videos stand out from your competitors.
View YouTube templates, subscribe stickers, music and everything else you need to make stand-out videos here.
Best reaction video channels for inspiration
Gaming reactions: Jacksepticeye
Gaming reaction videos are all about raw, unfiltered emotions—whether it's rage-quitting, epic wins, or terrifying horror game moments. Jacksepticeye, one of YouTube's biggest gaming personalities, brings high-energy commentary and a signature Irish charm to his playthroughs, making his reactions feel like you're gaming with a friend (a very loud friend).
Movie and TV reactions: The Normies
If you love watching shows with a group, The Normies have you covered. Their group reactions to hit TV shows like Breaking Bad, Stranger Things, and The Last of Us feel like a movie night with friends—except you don't have to share your popcorn.
Comedy and meme reactions: Charlotte Dobre
If you love sarcasm, sharp wit, and watching people get hilariously called out for their nonsense, Charlotte Dobre is a must-watch. Her reaction videos cover everything from cringeworthy social media fails to entitled people behaving badly, all delivered with her signature deadpan humor and expressive reactions.
Repurposing and resharing reaction videos
If you want to maximize views and engagement, repurposing your content across different platforms is the smart move.
Turning long-form reactions into Shorts, TikToks, and Reels
You can extract the funniest, most shocking, or most relatable moments from your full video and turn them into YouTube Shorts, TikToks, and Instagram Reels to reach a wider audience.
Creating GIFs and memes from your reactions
If your reaction is extra meme-worthy, why not turn it into a GIF or an image meme? Whether it’s a shocked face, cringe expression, or over-the-top laughter, these moments can live beyond your video and go viral in their own right.
Posting reaction clips on different platforms
Different platforms have different audiences. Repurposing content for each one increases the chances of it being seen by new viewers who might not be on YouTube. Best practices for each platform:
YouTube Shorts: keep it under 60 seconds, use attention-grabbing text overlays. Learn more about how to create YouTube Shorts.
TikTok: use fast cuts, zoom-ins, and viral sounds to blend into the platform’s style. If you’re new to editing, here’s how to make a TikTok video in Clipchamp.
Instagram Reels: repurpose the same TikTok clip but optimize with Instagram-friendly hashtags. Read how to create Instagram Reels for tips.
Twitter/X: post short X clips or GIFs with witty captions to drive engagement.
Copyright rules and avoiding strikes
Creating engaging content is great but reaction videos often include copyrighted material, so you must be careful about what you use and how you use it. Learn about copyright strike so your hours of editing won't get taken down or demonetized.
What you can and cannot use in reaction videos
Not all content is fair game. Using full-length movie clips, music videos, or TV shows without permission can get your video flagged. Platforms like YouTube use Content ID, an automated system that detects copyrighted material and either demonetizes your video or blocks it entirely (which is basically YouTube saying, “Yeah, no.”).
How to use fair use for reaction videos
The fair use doctrine allows creators to use copyrighted content under certain conditions, like adding significant commentary or critique. Here’s how to stay on the safe side:
Using small snippets instead of full scenes reduces the risk of copyright claims.
The more you add your own thoughts, the less likely it is to be flagged. Plus, it makes your video more entertaining!
Changing the video’s opacity, zooming in, or adding overlays can help bypass detection.
Mentioning the original creator can sometimes help, though it’s not guaranteed.
Watch how to edit reaction videos tutorial
Whether you’re reacting to a gameplay or fitness video, create engaging and high-quality videos for free with Clipchamp.
Find out more ways to level up your YouTube channel with branded YouTube channel trailers. You can even check out competitor analytics to stand out on YouTube.
Frequently asked questions
Can I share my YouTube reaction video on another social media platform?
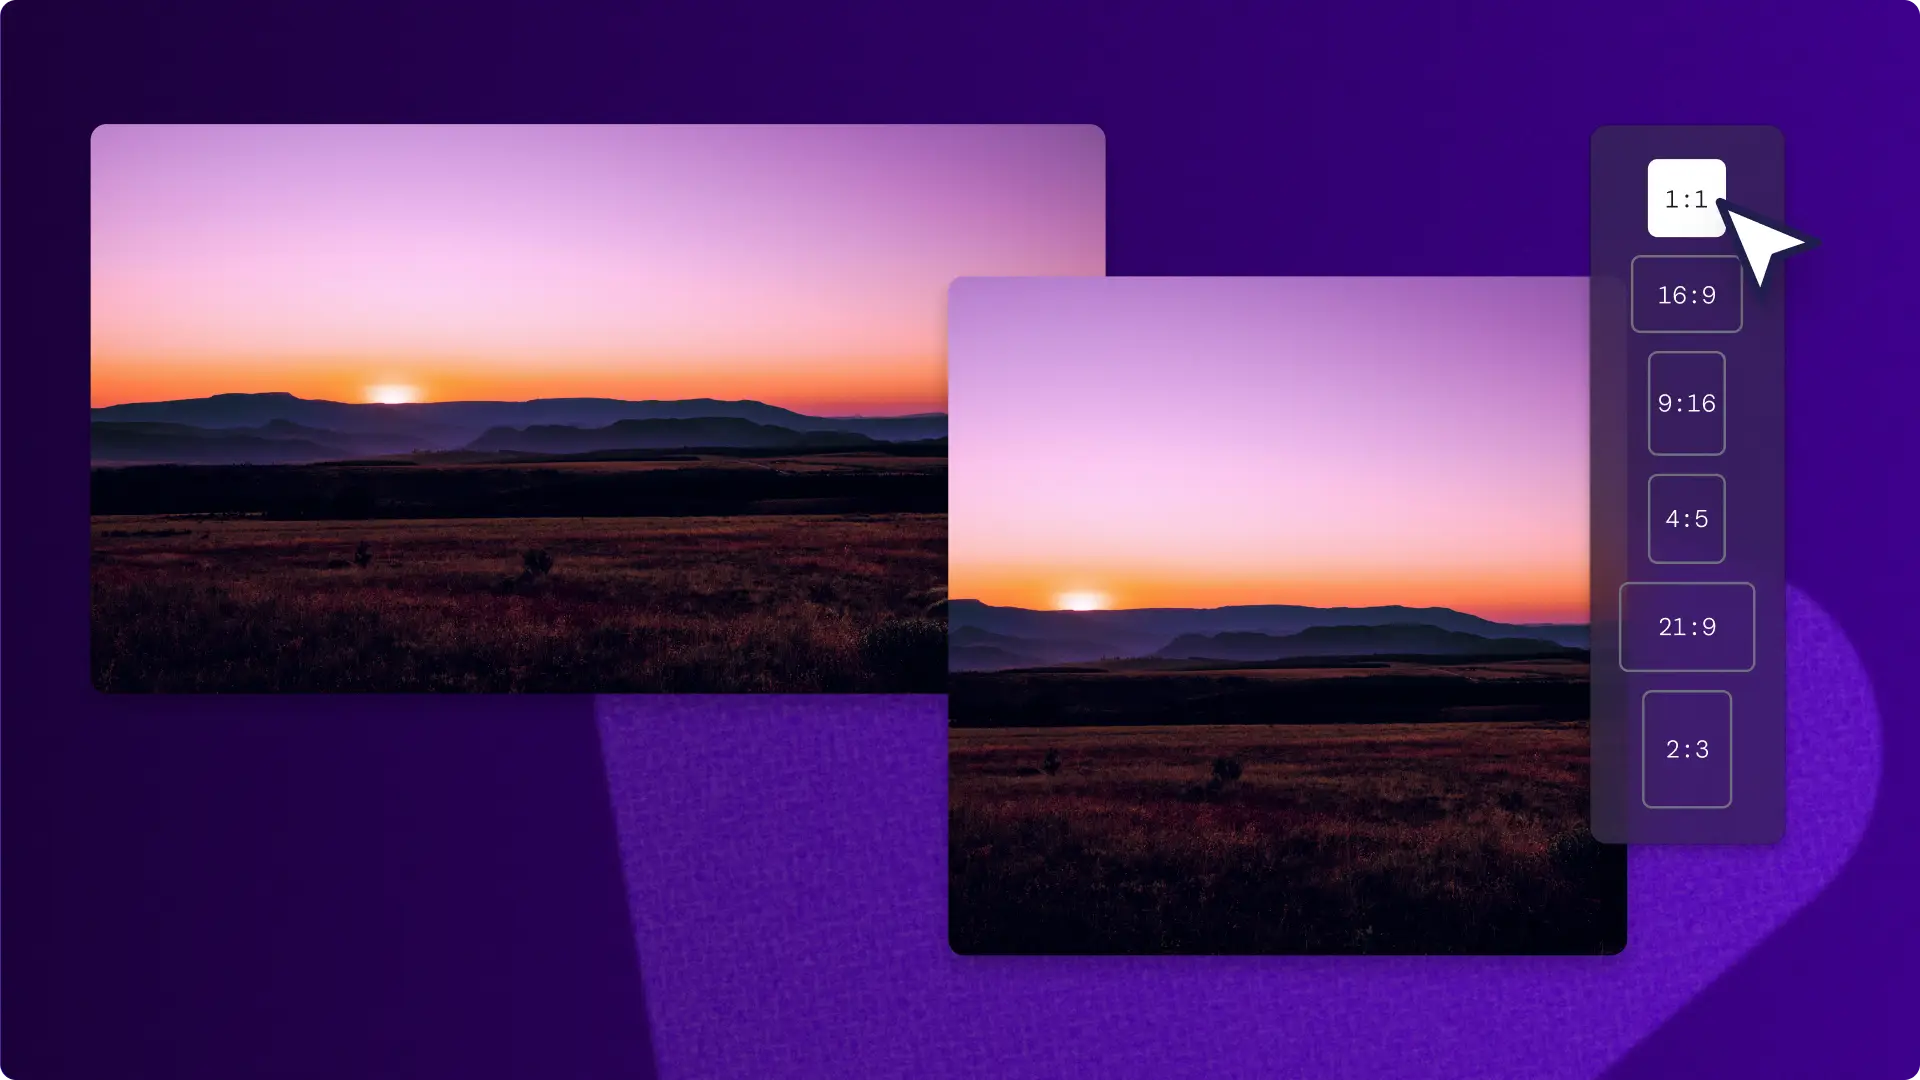
Yes. You can edit the aspect ratio of your video to suit other social media platforms like TikTok, Instagram, and Facebook in the editor. Select from 16:9, 9:16, 1:1, 4:5, 2:3, and 21:9 aspect ratios.
Can I make a YouTube reaction video on my iPhone?
If you want to record, edit, and caption YouTube reaction videos on the go, check out the iOS app for Clipchamp.
Can I add background music to a YouTube reaction video?
Easily add royalty-free audio to any YouTube reaction video using the free stock audio library. Just make sure to turn down the volume of your background music so it doesn’t overpower the video's original audio.
Are YouTube reactions fair use?
If you’re reacting to another creator’s video on YouTube, you may receive a copyright strike for publishing the video. Before downloading a video from YouTube, make sure to seek permission from the creator or owner of the video. Uploading reaction videos to YouTube isn’t illegal, but the video may risk being taken down or demonetized if permission isn’t granted. Always mention the original creator in the video's description. Creators can dispute and appeal reaction video copyright strikes under the making claims section using YouTube’s Copyright Management tool.